Related to MXSuite
FAQ related to MXSuite
- Field types of custom attributes
- Update MXSuite V3 to a newer version
- Custom Properties and Word merge
- API interface
- Why don't I have enough space on the disk while we are processing document packages?
- MXSuite Excel Import – Export
- General info
- AssetsCategories
- AssetsCategoriesProperties
- Counters
- AssetsTasksGroups
- AssetsTasks
- AssetsTasksRanks
- AssetsTasksApproversRanks
- AssetsTasksParts
- C-drive full during synchronisation
- The specified network password is not correct.
- Unable to upload big files
Field types of custom attributes
At several places in MXSuite custom attributes are used to populate data. Each field type has its own behavior. Below is the overview with all field types and explanations.
An example of a form with all field types: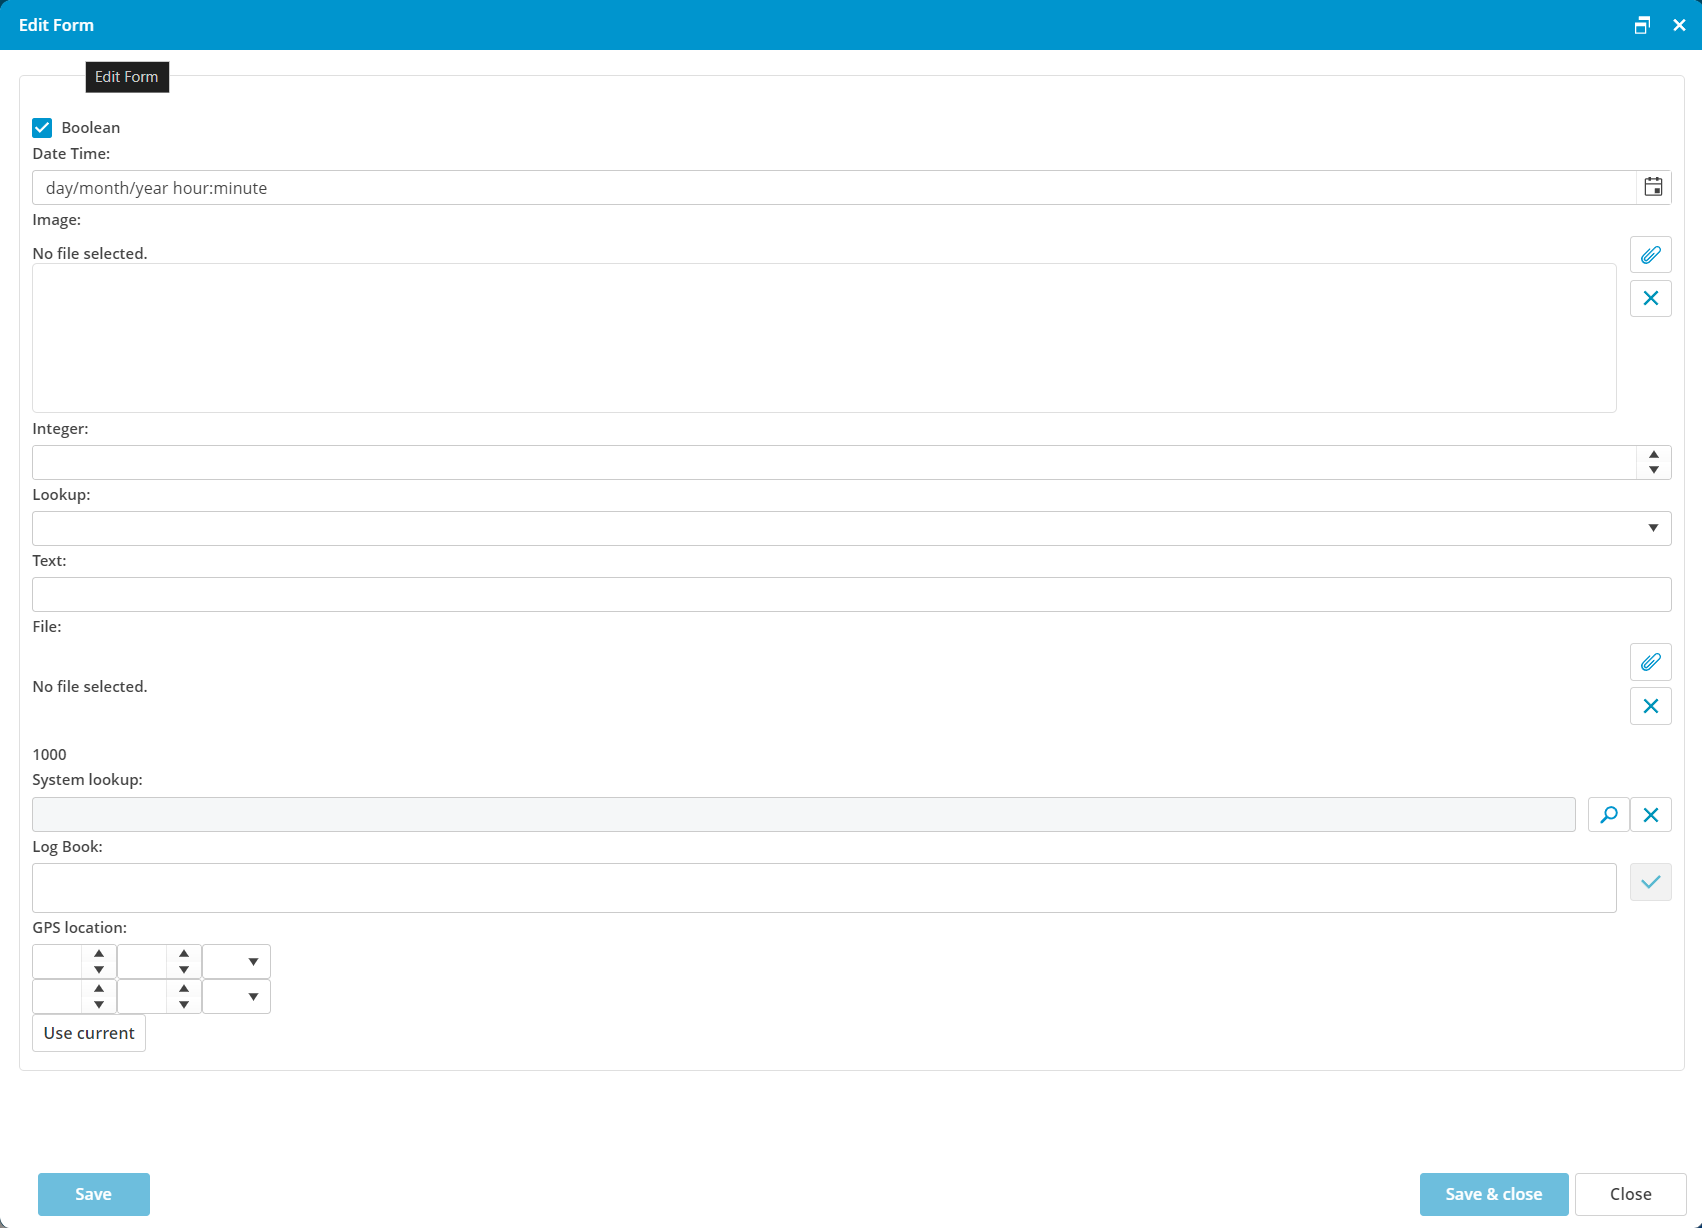
| Type | Description | Image |
|---|---|---|
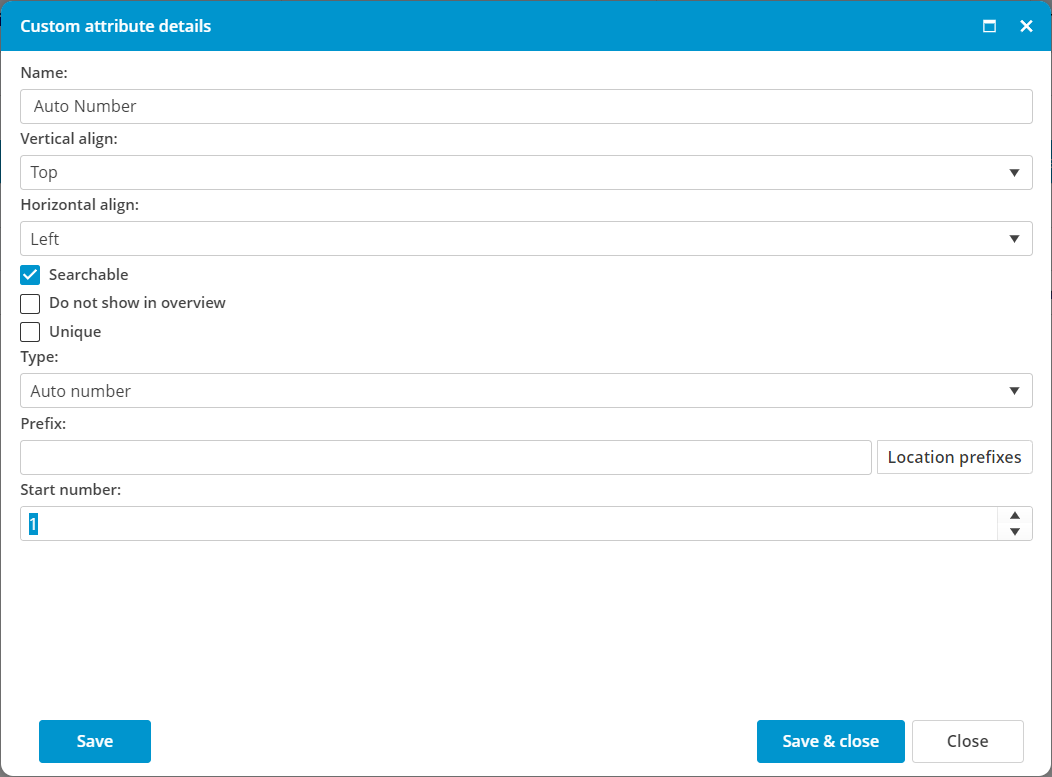
AUTO NUMBER |
This is an automatically generated sequential number. It can be used for example to have a unique numbering for created documents.
Configuration options:
|
 |
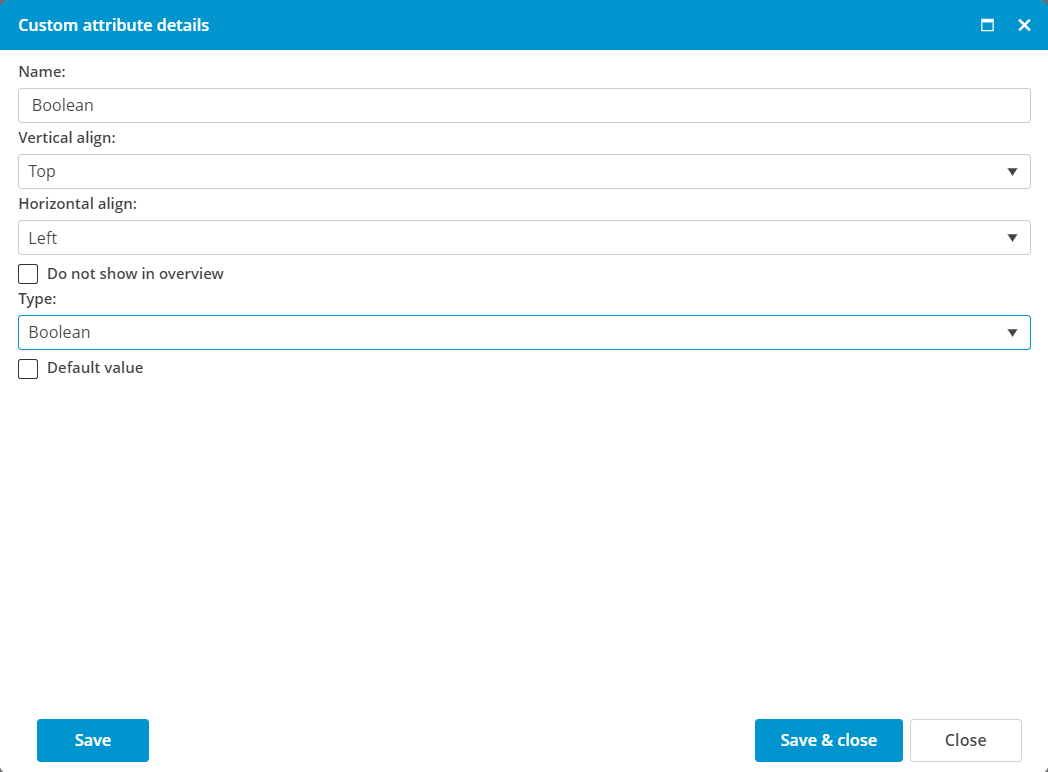
BOOLEAN |
This is a yes/no tickbox.
Configuration options:
|
 |
DATE TIME |
This is a field where the date can be filled or chosen from a calendar. Also can be defined if the field should contain only the date or the time as well.
Configuration options:
|
 |
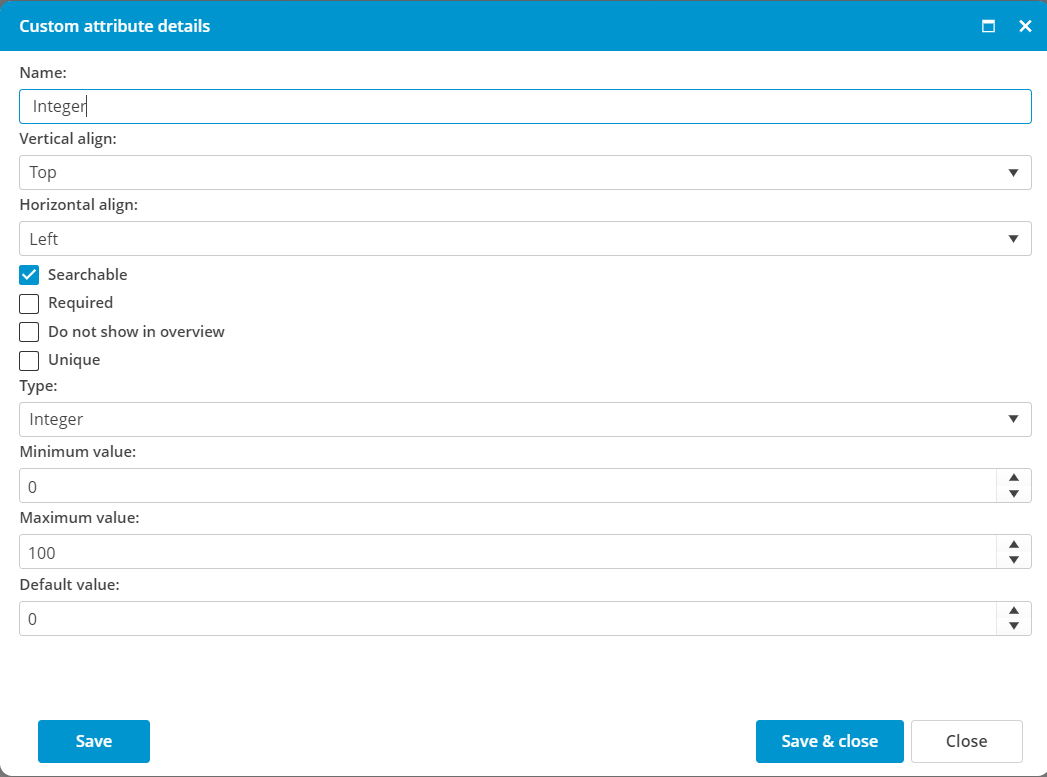
DOUBLEand INTEGER |
This is a numeric field. The difference between a double and an integer:
Configuration options:
|
|
LOOKUPand SYSTEM LOOKUP |
A lookup is a list with predefined selections. The difference between a lookup and a system lookup:
Configuration options:
|
|
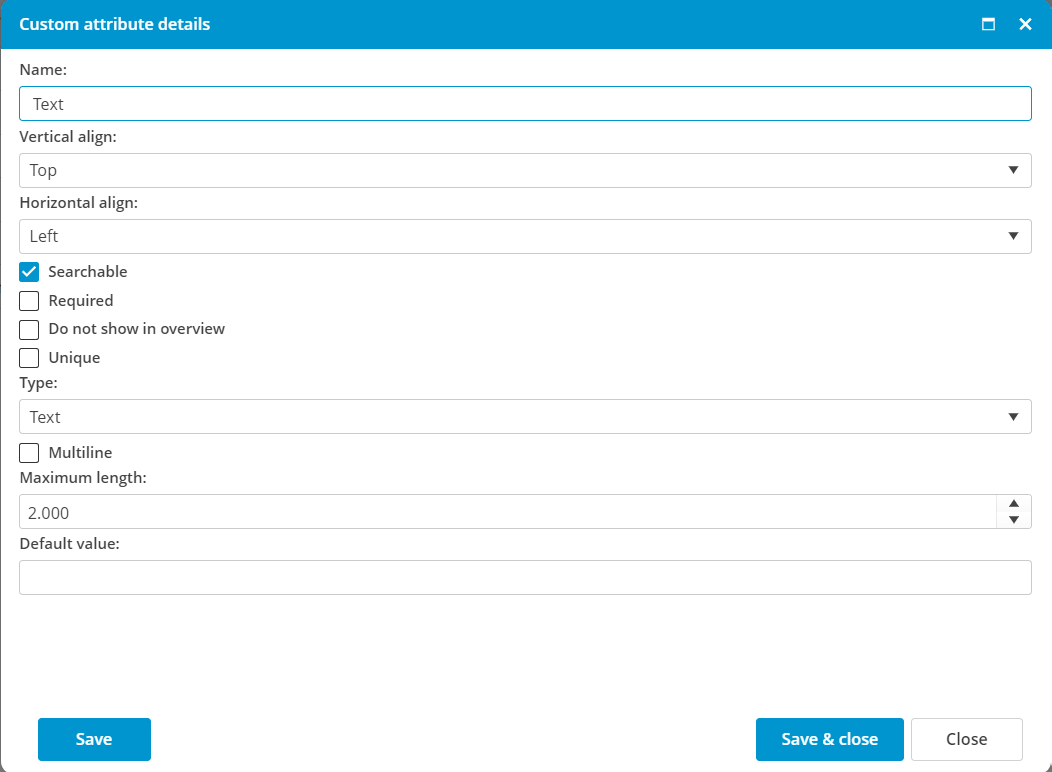
TEXT |
A text field is a field where a free text can be entered.
Configuration options:
|
|
LOGBOOK |
A logbook is an extended version of a text field. Every new entry will be saved with username and date and time.
Configuration options:
|
|
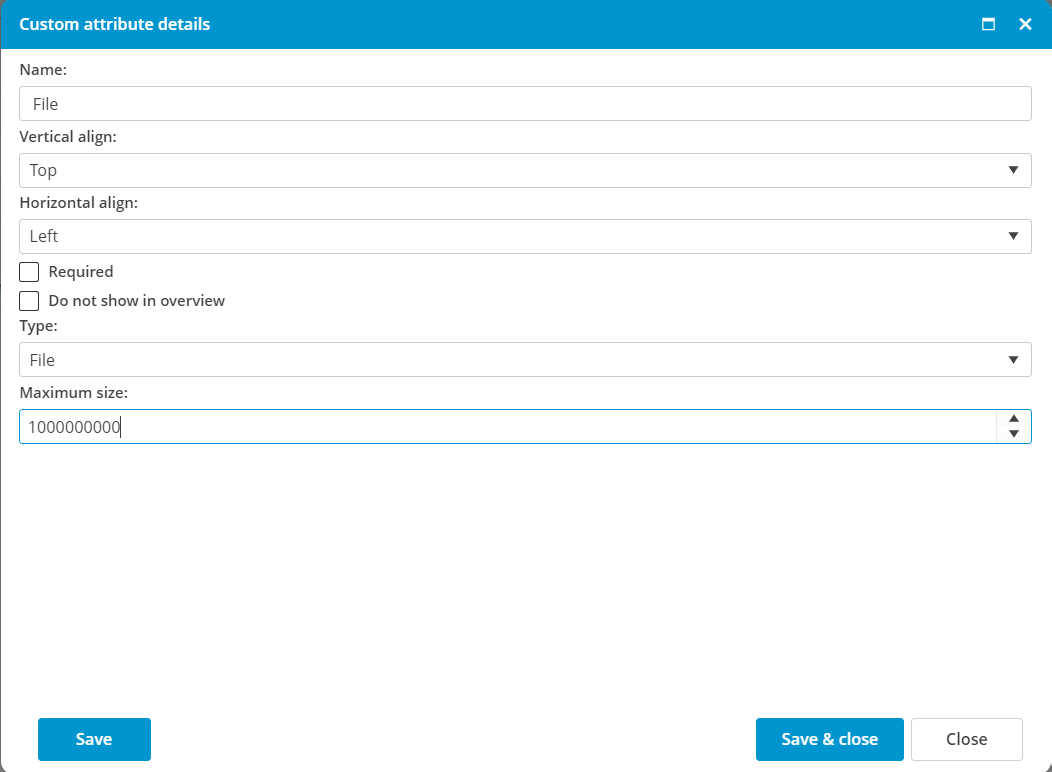
IMAGEand FILE |
An image or a file can be used to save an attachment to MXSuite.
Configuration options:
|
|
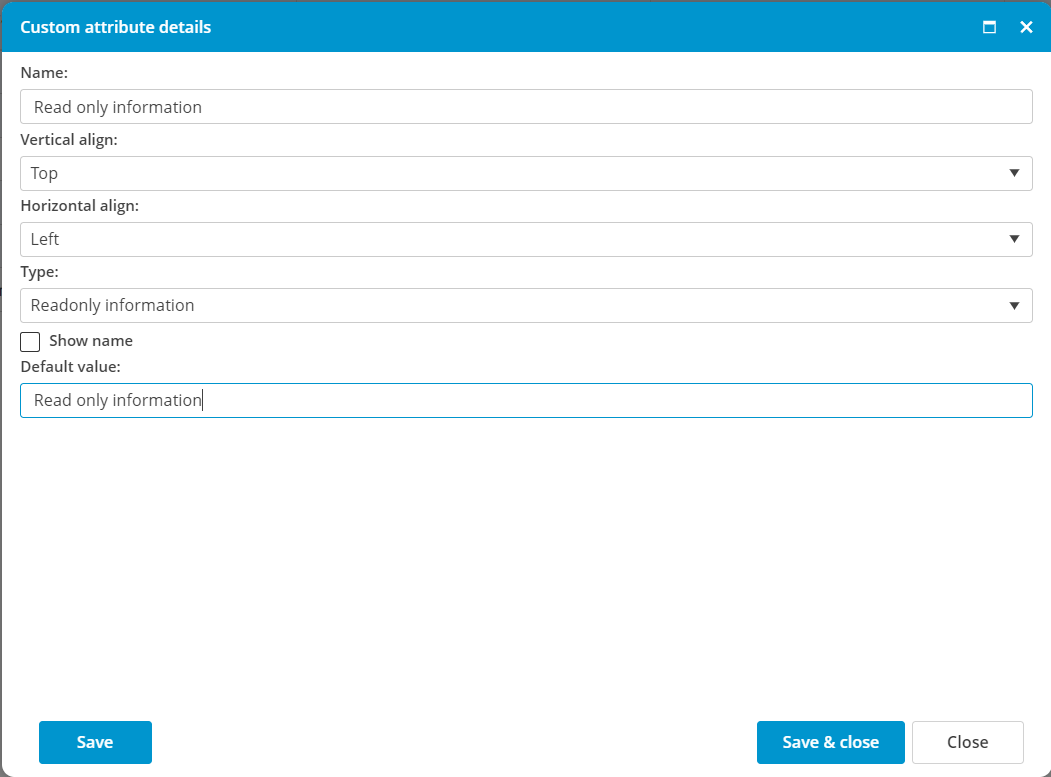
READ ONLY |
Read-only information is used to show a text in the form or page, which is helpful for the user. Configuration options:
|
|
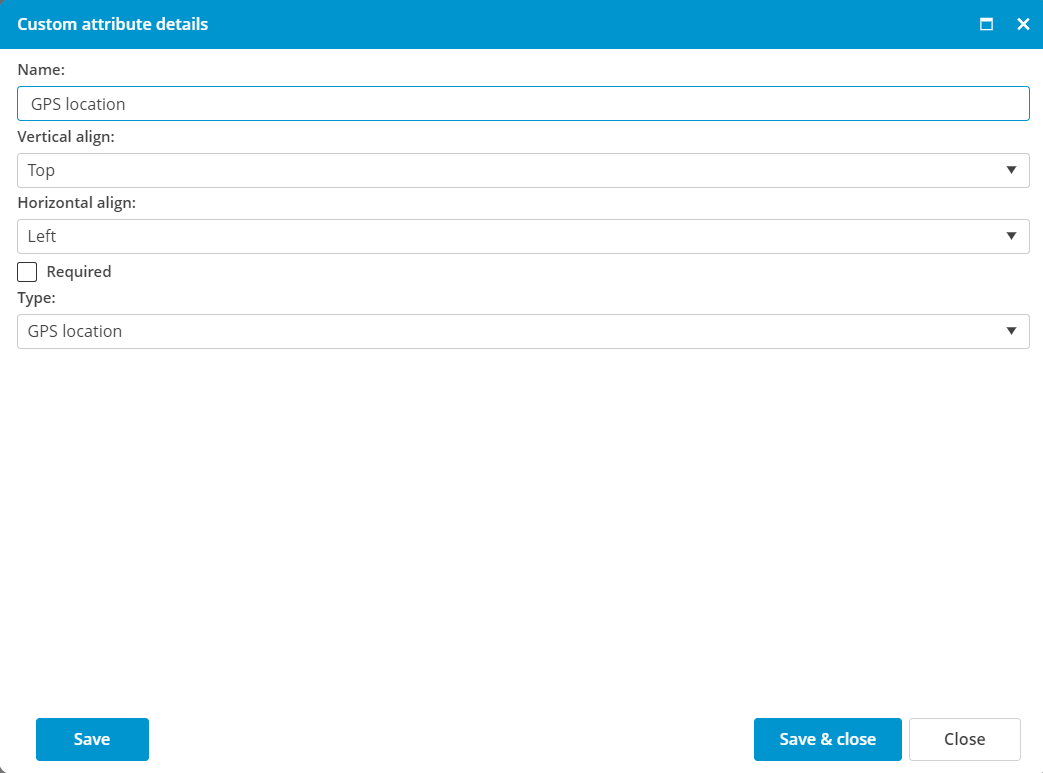
GPS |
With a GPS field, the exact position can be saved in Degrees, Minutes and Seconds.
Configuration options:
|
|
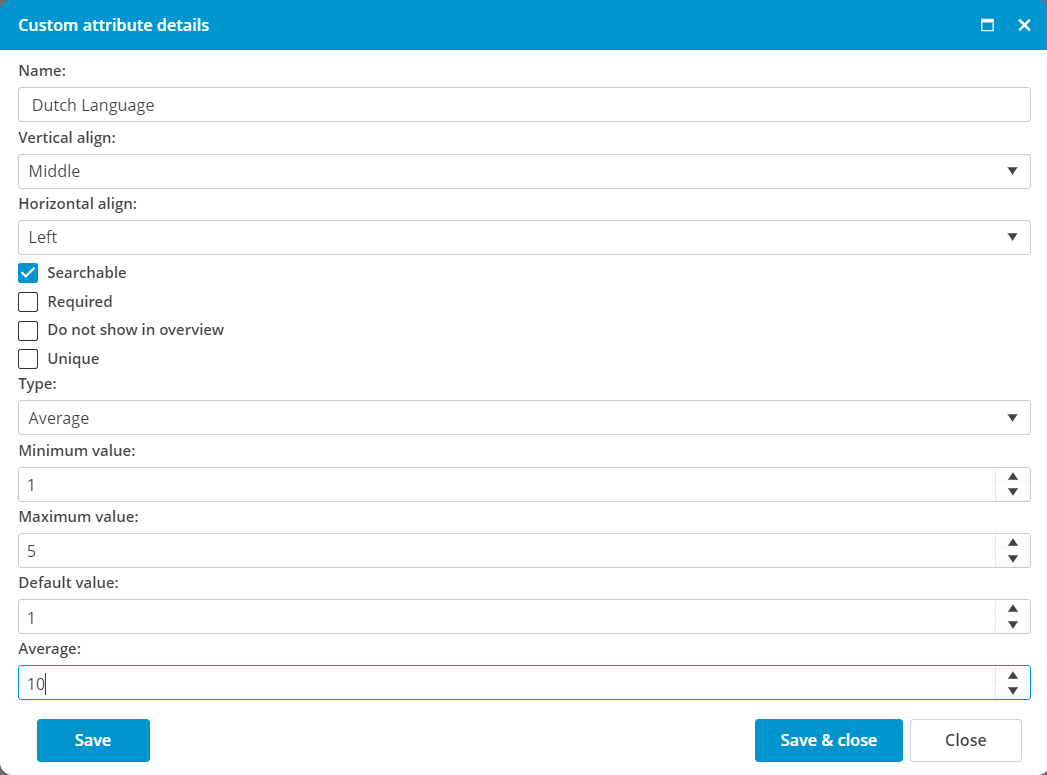
AVERAGE |
In the field Average, you can add a numeric value including decimals. For each average attribute, you can decide how much the score will adjust the overall score. The total value of all average fields should be in total 100.
Configuration options:
|
|


Update MXSuite V3 to a newer version
To update MXSuite V3 to the latest version available please follow the below steps.
There is no need to create a backup of the database as the update does not affect the data in the database and cannot cause any loss.
- Check if there is a new version available for the update.
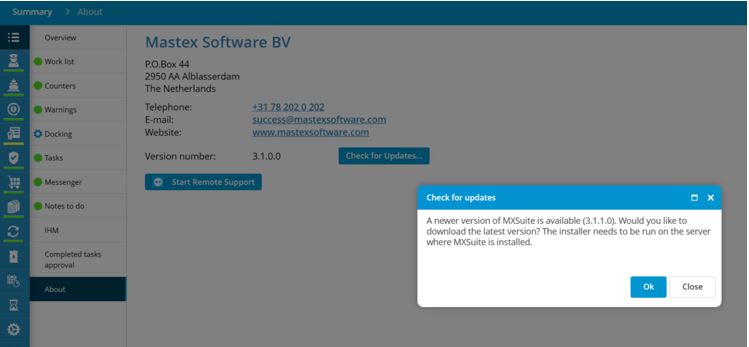
- Go to Summary -> About -> Check for Updates
- A pop-up window appears with the information (either that you are already on the latest version or about the latest version available):

- Download the latest version
- Press OK to proceed with the download of the latest version (screenshot above).
- Press OK to proceed with the download of the latest version (screenshot above).
- Wait until the download is finished.
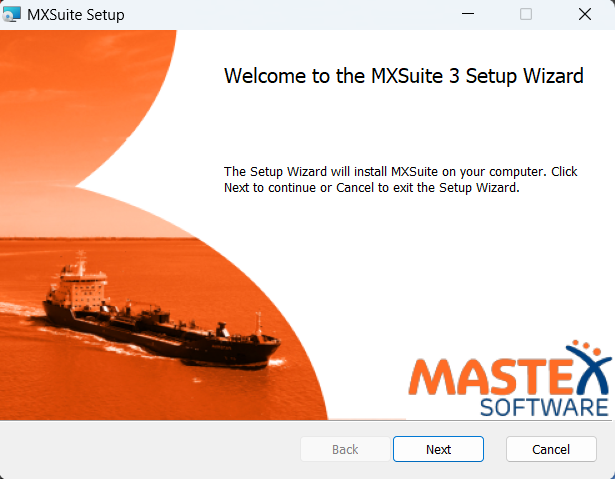
- Open the downloaded file, and right click on the installation file -> Run as administrator
The installation file should be run as administrator to be able to update all files.
- Follow the steps from the installation wizard (click on Next button)

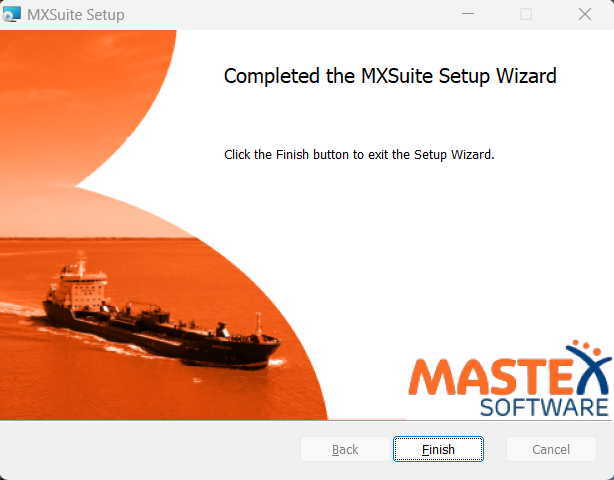
- The update is ready and installed successfully the message shows: Completed the MXSuite Setup Wizard

Custom Properties and Word merge
In MXSuite
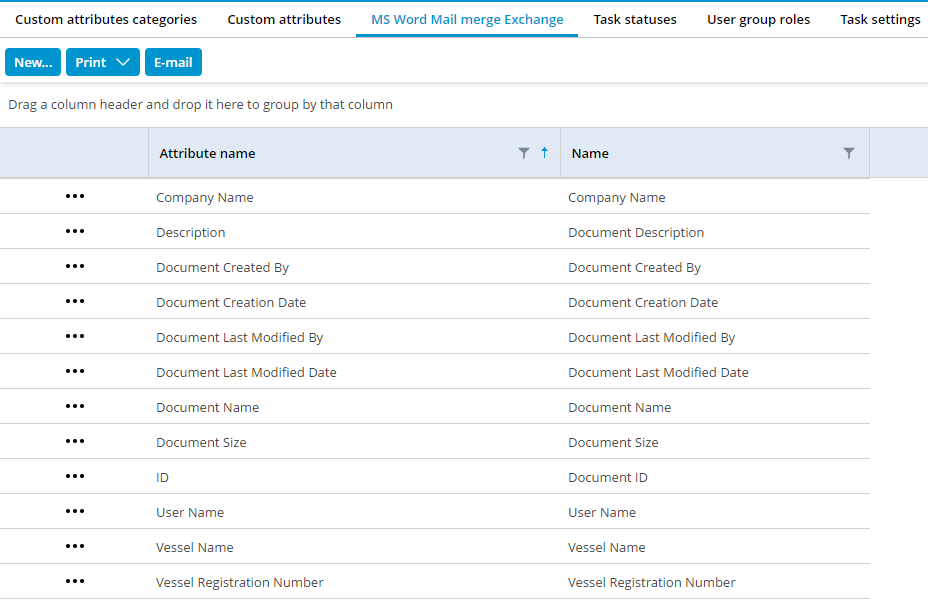
The fields that are available to merge to a Microsoft Word document, are defined in MXSuite. You can find these fields in:
- For the document module:
Administration > Documents > Custom Properties
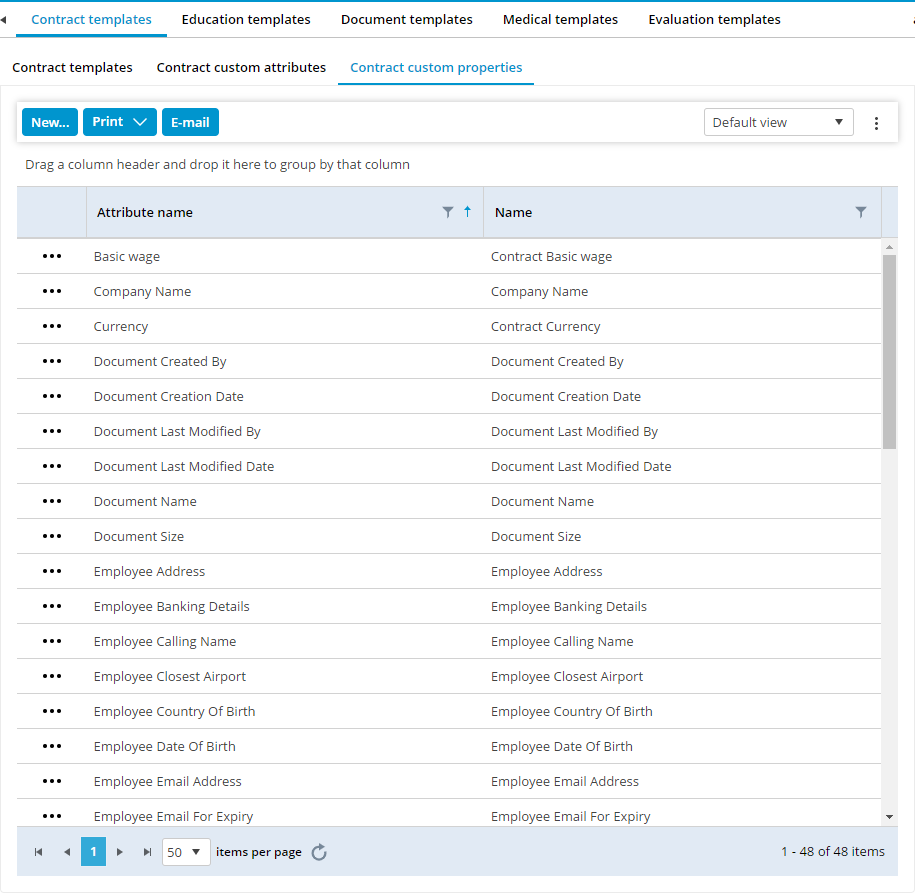
- For the crewing module:
Administration > Crewing > Contract Templates > Contract Custom Properties
or
Administration > Crewing > Contract Templates > Conformation of employment Custom Properties
In Microsoft Word
Open the document in Microsoft Word and do the following.
- Select File
- Select Info
- Click on the arrow right of Properties
- Select Advanced Properties.

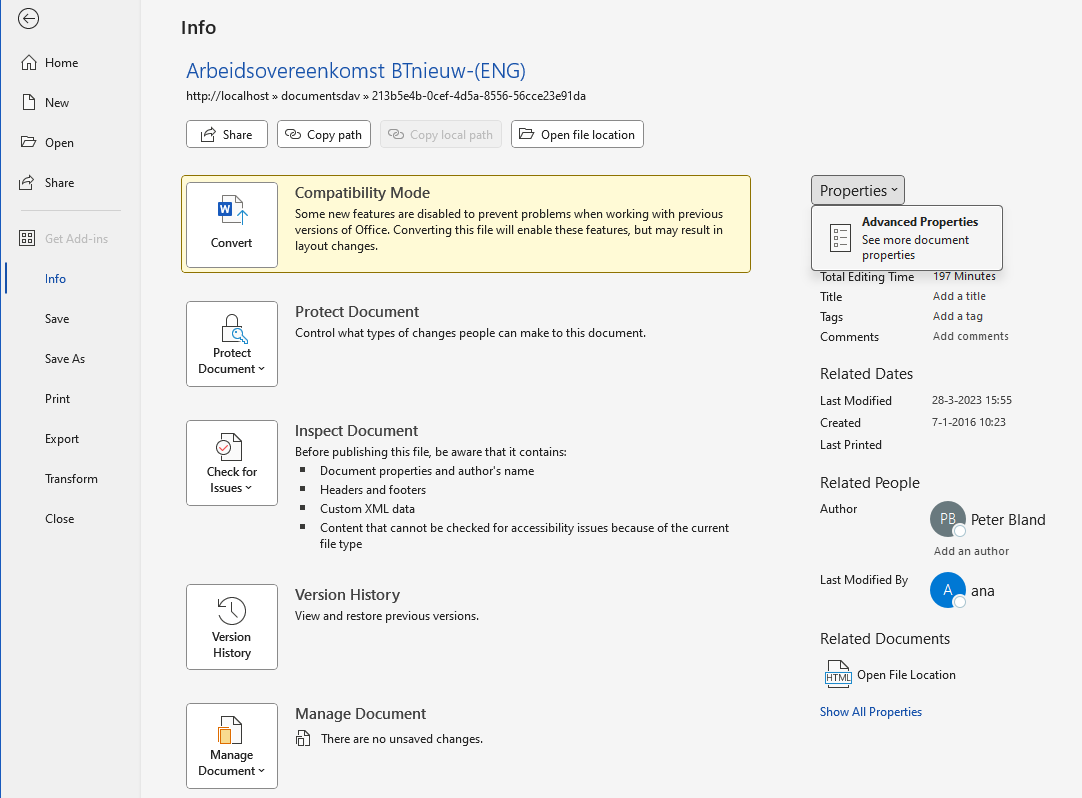
When the popup opens, select the Custom tab.
Add new text values with the same descriptions as defined in MS Word Mail merge Exchange. These fields are case sensitive so it needs to be used “Vessel Name” and not “vessel name”.
In the content of the document
- Select the tab Insert
- Select Quick Parts
- Select Fields
- Choose the category: Document information
- Select field name: DocProperty
In the right window, you get your properties.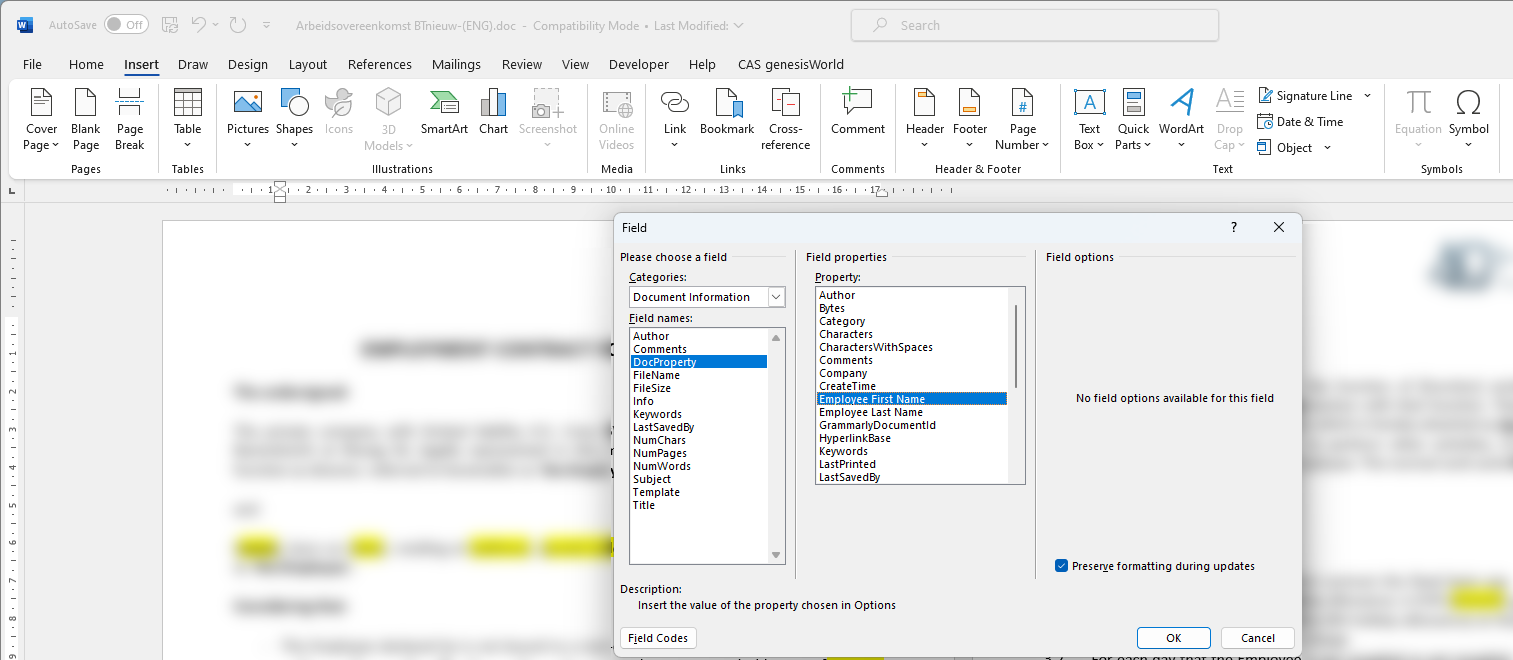
At Vessel Name insert, automatically in MXSuite the name of the vessel is inserted in the document.
API interface
The application programming interface (API) is used to make a connection between MXSuite and other software.
Manage API keys
The HTTP(S) API has been available since MXSuite version 3.3.0.
To create an API key, there are 2 steps needed:
- Create the API-user
- Create the API-key
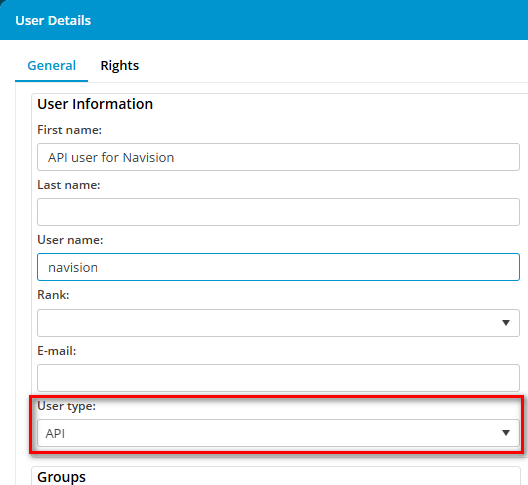
Create an API user
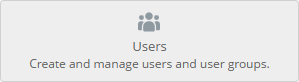
- Open the Administration module
- Click on Users

- Create a new user for the API with the correct user rights. Assure that you select user type API.

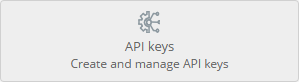
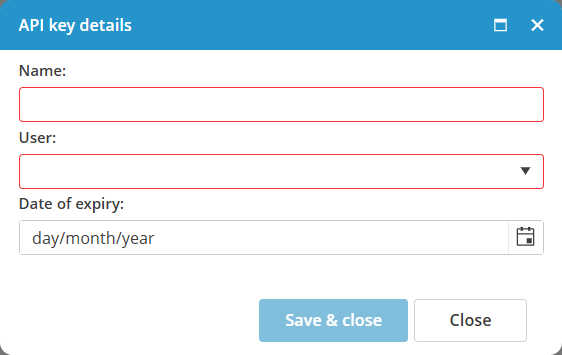
Create the API key
- Open the Administration module
- Click on API keys

- Click on New...

- Enter the Name of the API so you can easily distinguish all API keys.
- Select the related API user
- If needed, enter an expiry date.
- Click on Save & close
- Now the API key is created and visible.
General API usage
Authentication
To access the API, first an API key needs to be created from the Administration page. The key will be used as a header in the HTTP request.
MXSuite expects a mx-apikey header on each request.
mx-apikey: apikeyBesides the mx-apikey header, two more headers are required.
accept: application/json, text/plain, */*
content-type: application/json
Error handling
Successful responses will return a 200 or 204 HTTP response code. Errors will return a 4xx or a 5xx.
Some scenarios of errors:
- missing the mx-apikey header
- wrong api key
- expired api key
- MXSuite license expired
- The user doesn't have enough rights for that specific request
Examples
Below an example of how to use the API key in MXSuite. In this example the following parameters are used:
- URL for MXSuite: http://localhost:4200/
- Location mane: vessel2
- API key: 4a74ad039ffc4f3288da7a0e03e608da
Postman
Postman can be downloaded here: https://www.postman.com/downloads/
Open Postman, click on Import button and paste the following command:
curl 'http://localhost:4200/api/ExternalCounters/UploadCountersHistory' \
  -H 'accept: application/json' \
  -H 'content-type: application/json' \
  -H 'mx-apikey: 4a74ad039ffc4f3288da7a0e03e608da' \
  --data-raw '[{"name":"c1","locationName":"vessel2","value":1119,"timestamp":"2024-10-05T12:11:11.000Z"},{"name":"C2","locationName":"Vessel2","value":2229,"timestamp":"2024-10-05T12:11:11.000Z"},{"name":"c3","locationName":"Vessel2","value":3339,"timestamp":"2024-10-05T12:11:11.000Z"}]'
In the Headers tab the API key can be changed:
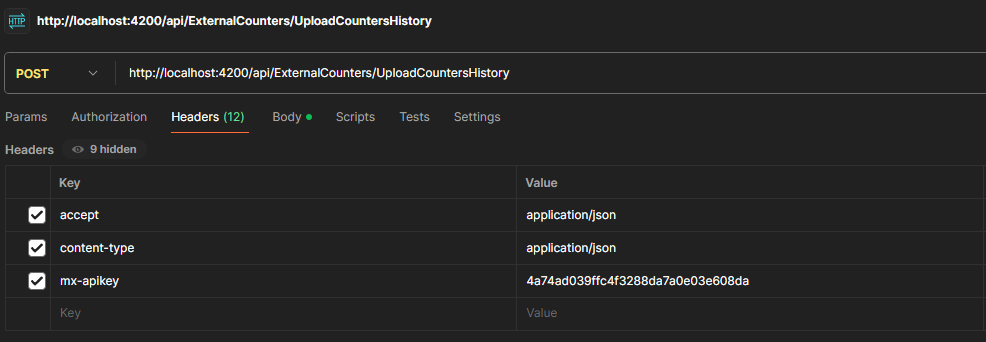
In the Body tab, the payload value can be changed.

Console
Define a payload variable:
let payload = [
    {
        "name": "c1",
	"locationName": "vessel2",
        "value": 1119,
        "timestamp": new Date(2024,09,05,15,11,11)
    },
    {
        "name": "C2",
	"locationName": "Vessel2",
        "value": 2229,
        "timestamp": new Date(2024,09,05,15,11,11)
    },
    {
        "name": "c3",
	"locationName": "Vessel2",
        "value": 3339,
        "timestamp": new Date(2024,09,05,15,11,11)
    }
];
Request:
fetch("http://localhost:4200/api/ExternalCounters/UploadCountersHistory", {
  "headers": {
    "accept": "application/json",
    "content-type": "application/json",
    "mx-apikey": "4a74ad039ffc4f3288da7a0e03e608da",
  },
  "body": JSON.stringify(payload),
  "method": "POST"
}).then(response => response.json())
  .then(data => console.log(data))
  .catch(error => console.error('Error:', error));
Don't forget to change the mx-apikey header value
Update counters via API
Overview
The Counters API provides endpoints for managing running hours (counters) within the MXSuite system. This API allows you to upload counter history records for one or more counters at a location, with proper authorization controls.
Base URL
- api/external/Counters/
1. Upload Counters History
Overview
The Upload Counters History endpoint allows authorized users to upload a batch of running hours (counter) history records for one or more counters at a specific location. This is typically used to record the latest readings for equipment counters.
Endpoint
POST /api/external/Counters/UploadCountersHistory
Authentication
All endpoints require authentication and appropriate user rights.
This endpoint requires the UpdateRunningHours right and the location must not be read-only.
Authorization is enforced via the MXApiPolicyAuthorize attribute.
Request
{
  name: string,
  locationName: string,
  value: number,
  timeStamp: Date
}
[
{
"Name": "Main Engine",
"LocationName": "Neptune",
"Value": 12345,
"TimeStamp": "2025-06-23T14:00:00Z"
},
{
"Name": "Generator 1",
"LocationName": "Neptune",
"Value": 6789,
"TimeStamp": "2025-06-23T14:00:00Z"
}
]
Error Responses
• 400 Bad Request: Invalid input data (e.g., missing required fields, invalid values).
• 401 Unauthorized: User is not authenticated.
• 403 Forbidden: User does not have the required rights or location is read-only.
• 500 Internal Server Error: An unexpected error occurred.
If there is no location with that name, the entry is ignored.
If there is no counter with that name for that location, the entry is ignored.
If there is already an entry added for that counter in that location with the same value and timestamp, the entry is ignored.
API for Assets Tasks
Overview
The Assets APIs provides endpoints for managing assets categories, assets groups, assets tasks and sign off tasks within the MXSuite system. This API allows you to retrieve assets categories, assets groups and task sign offs, to create, update, delete and retrive assets tasks with proper authorization controls.
Base URL
- api/external/AssetsCategories/
- api/external/AssetsGroups/
- api/external/AssetsTasks/
- api/external/AssetsTaskSignOffs/
1. Assets Categories
Overview
Base URL
api/external/AssetsCategories/
Authentication
Endpoints
1. Get categories
Endpoint:GET /api/external/AssetsCategories/Get?locationName=Neptune
Request:
Query parameter:
• locationName=Neptune
Validations:
- LocationName: Required, max length 128.
Response:
[
  {
    "id": "b1a2c3d4-e5f6-7890-abcd-1234567890ab",
    "uniqueId": "CAT-001",
    "name": "Engine Room",
    "parentId": "c2b3a4d5-e6f7-8901-bcda-2345678901bc",
    "displayIndex": 1
  }
]
2. Assets Groups
Overview
Base URL
api/external/AssetsGroups/
Authentication
Endpoints
1. Get groups
Endpoint:
GET /api/external/AssetsGroups/Get?categoryId=b1a2c3d4-e5f6-7890-abcd-1234567890ab
Request:
Query parameter:
• categoryId=b1a2c3d4-e5f6-7890-abcd-1234567890ab
Response:
[
  {
    "id": "d3e4f5a6-b7c8-9012-cdab-3456789012cd",
    "type": 1,
    "uniqueId": "GRP-001",
    "name": "Auxiliary Systems",
    "displayIndex":1
  }
]
Validations:
- CategoryId: Required, valid GUID
3. Assets Tasks
Overview
{
  "GroupId":"3C160DF1-3A5C-406F-BAC6-00A4AB8C44A9",
  "GroupType":1,
  "UniqueId": "Task-001",
  "TaskName": "Oil Change - Updated",
  "Interval": 45,
  "IntervalType": 1,
  "DueDate": "2025-06-01T00:00:00Z",
  "IsCounterBased": false,
  "IsRemarkMandatory": true,
  "IsProject": false,
  "IsRecurrent": true,
  "IsFixedInterval": true,
  "IsAtServiceRequest": false,
  "IsDefect": false,
  "TaskDescription": "Updated description for oil change.",
  "MaxInterval": 90,
  "MaxIntervalType": 2,
  "DueCounters": 150,
  "Downtime": 3.0,
  "WarningInterval": 10,
  "WarningIntervalType": 1,
  "CounterName": "Main Engine",
  "DefaultEstimatedBudget": {
    "Amount": 600.0,
    "Currency": "USD"
  },
  "Ranks": ["Rank1", "Rank2"],
  "ApproverRanks": ["Approver1"],
  "RequiresApproval": true
}
Base URL
api/external/AssetsTasks/
Authentication
Endpoints
1. Create Maintenance Task
Endpoint
Authorization Required:
- User must have AddMaintenanceTask rights
Validations
- GroupId: identifies the group together with GroupType. Both are required
- UniqueId: Max length 50. Not required, but should be unique if provided.
- TaskName: Required, max length 128, must be unique.
- Interval: Must be greater than 0, within limits based on IntervalType.
- IntervalType, MaxIntervalType or WarningIntervalType: should contain one of these values:
-
- 1 = days
- 2 = weeks
- 3 = months
-
- DueDate: Must be between 01/01/1900 and 01/01/2100.
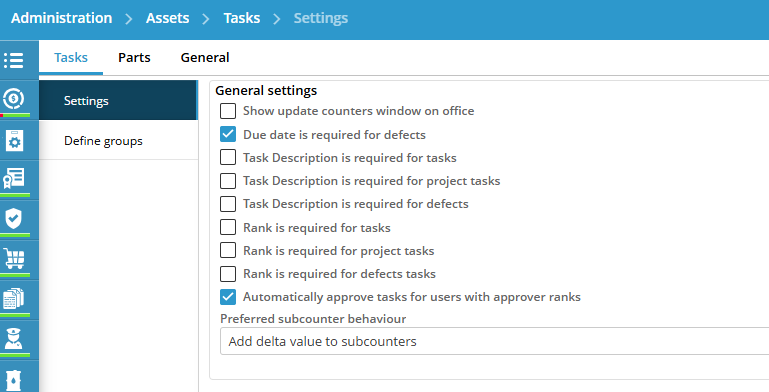
- TaskDescription: Required depending on how it is set in Administration > Assets > Tasks > Settings

- Ranks: Required for tasks requiring approval.
- RequiresApproval: Must be false for Silver licenses.
- ApproverRanks: Required only if RequiresApproval is set to true.
- Currency: when provided, it should contain the currency name as seen in Administration > Currencies

- When a rank is provided (e.g.: Ranks or ApproverRanks), the name from Administration > Ranks should be used:

- CounterName: required when IsCounterBased is set to true. The values provided should be the ones defined in Symmary > Counters
- WarningInterval + WarningIntervalType: required when IsCounterBased is set to true.

Errors
- 409 Conflict
- 404 Not Found: Task not found.
- 412 Precondition failed: Exceeding limits for intervals
- 403 Forbidden
- 400 Bad Request: Validation errors and required fields
Response
{
  "TaskId": "1463aea5-9062-45bf-8b9c-24cc5615d467"
}
Fields details:
- General task details

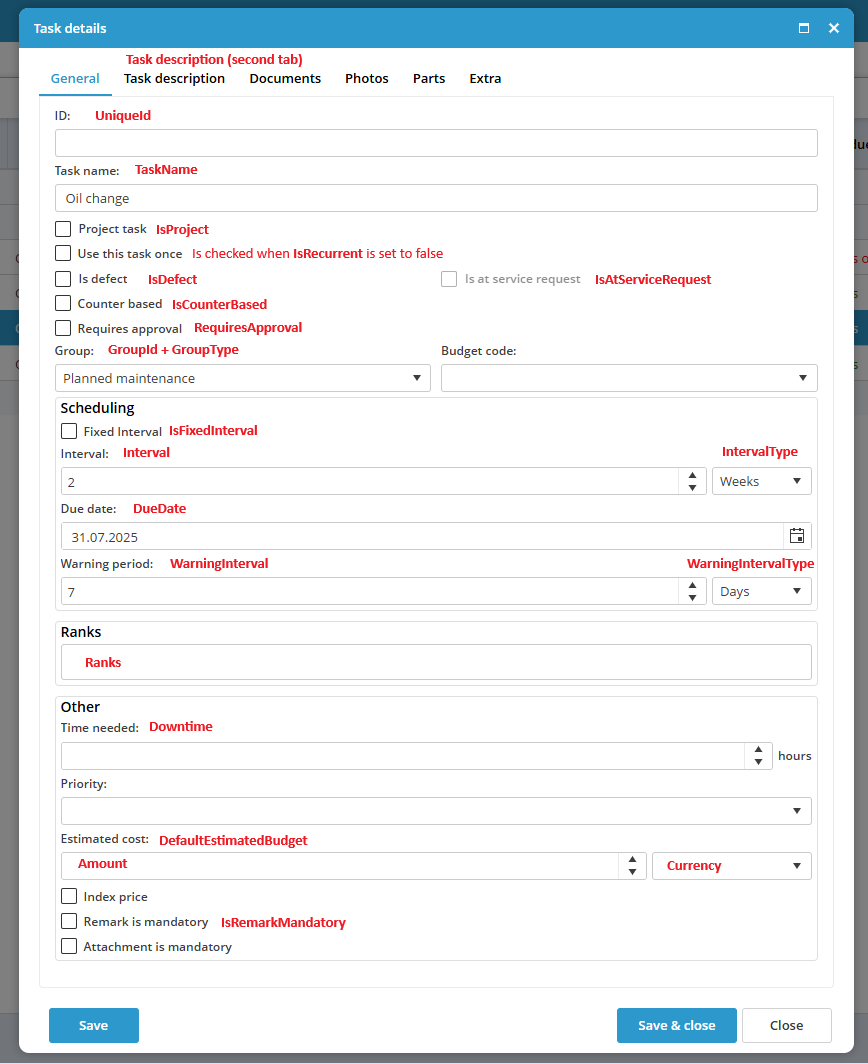
- Counter based tasks:

- Approver ranks:

2. Update Maintenance Task
Endpoint
Authorization Required
- User must have EditMaintenanceTask rights
{
  "UniqueId": "Task-001",
  "TaskName": "Oil Change - Updated",
  "TaskId": "1463aea5-9062-45bf-8b9c-24cc5615d467",
  "GroupId":"3C160DF1-3A5C-406F-BAC6-00A4AB8C44A9",
  "GroupType":1,
  "Interval": 45,
  "IntervalType": 1,
  "DueDate": "2025-06-01T00:00:00Z",
  "IsCounterBased": false,
  "IsRemarkMandatory": true,
  "IsProject": false,
  "IsRecurrent": true,
  "IsFixedInterval": true,
  "IsAtServiceRequest": false,
  "IsDefect": false,
  "TaskDescription": "Updated description for oil change.",
  "MaxInterval": 90,
  "MaxIntervalType": 2,
  "DueCounters": 150,
  "Downtime": 3.0,
  "WarningInterval": 10,
  "WarningIntervalType": 1,
  "CounterName": "Main Engine",
  "DefaultEstimatedBudget": {
    "Amount": 600.0,
    "Currency":  "EURO"
  },
  "Ranks": ["Rank1", "Rank2"],
  "ApproverRanks": ["Approver1"],
  "RequiresApproval": true
}
Validations
Same as the Create action.
Errors
- 409 Conflict
- 404 Not Found: Task not found.
- 412 Precondition failed: Exceeding limits for intervals
- 403 Forbidden
- 400 Bad Request: Validation errors and required fields
Validations
• taskId: Required, must be a valid GUID.
Errors
• 404 Not Found: Task not found.
• 500 Internal Server Error: Unexpected errors.
4. Get
Endpoint
/api/external/AssetsTasks/Get?taskId={taskId}
Validations
• taskId: Required, must be a valid GUID.
5. Get Multiple Tasks
Endpoint
/api/external/AssetsTasks/GetTasks
Request JSON
[
    "1463aea5-9062-45bf-8b9c-24cc5615d467",
    "7b95cb8b-0cb8-4cdf-ad3e-3285a162cbea"
]
Validations
• taskIds: Required, must be a list of valid GUIDs.
6. Get Tasks Ids
Retrieves the IDs of maintenance task/s.
• URL: /api/external/AssetsTasks/GetTasksIds
Authorization Required
- Location must not be read-only
Request body
{
  "GroupId": "d3e4f5a6-b7c8-9012-cdab-3456789012cd",
  "GroupType": 1
}
[
  "e4f5a6b7-c8d9-0123-dabc-4567890123de",
  "f5a6b7c8-d9e0-1234-abcd-5678901234ef"
]4. Assets Task Sign Offs
Overview
Base URL
api/external/AssetsTaskSignOffs/
Authentication
Endpoints
1. Get Sign-Offs
{
  "TaskId": "7b95cb8b-0cb8-4cdf-ad3e-3285a162cbea",
  "NumberOfSignOffs": 5
}
Validations
• TaskId: Required, must be a valid GUID.
• NumberOfSignOffs: Optional, must be a valid number.
• The LocationIsNotReadOnly flag must be true for all operations.
Error Responses
All error responses follow this structure:
{
  "Errors": [
    {
      "message": "string",
      "errorCode": number,
      "isBusinessException": false,
      "businessExceptionData": null,
      "failureServerReason": null
    }
  ]
}
{
"errors": [
{
"message": "Category name is required",
"errorCode": 9,
"isBusinessException": false,
"businessExceptionData": null,
"failureServerReason": null
}
]
}
- 400 Bad Request
- When request validation fails
- When required fields are missing
- When field values are invalid
- 403 Forbidden
- When location is read-only
- When user doesn't have sufficient permissions
- 404 Not Found
- When requested task doesn't exist
- When location or category doesn't exist
- 409 Conflict
- When trying to create a duplicate task
- When task name already exists in the specified location/category/group
Validation Rules and status codes
Status: 400 Bad Request
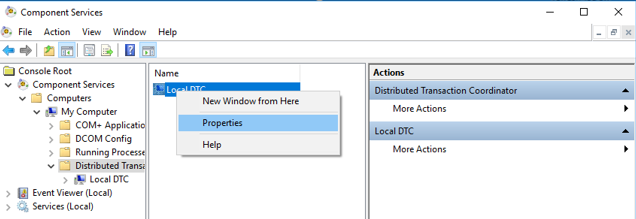
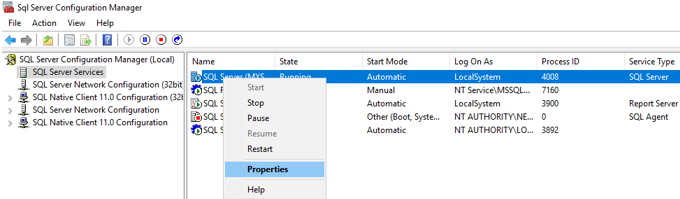
Why don't I have enough space on the disk while we are processing document packages?
Processing the document package creates a very big temp file on the disk. The temporary file is located in C:\temp.
The steps to solve this issue are the following in Windows settings:
- Open Component Services from Windows Start
- Click on Distributed Transaction Coordinator
- Right click on Local DTC
- Click on Properties (a new window will open)

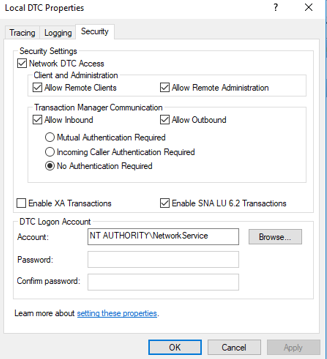
- Click on tab Security
- Enable Client and Administration / Transaction Manager Communication

- Open SQL Server Configuration Manager from Windows Start
- Click on SQL Server Services
- Right click on SQL Server (MXSuite)
- Click on Properties (a new window will open)
- Go to the tab Filestream
- Enable Filestream for transact SQL access
If sharename MXSuite already exists, use the filestream share name MXSuite2

- Open Services from Windows Start
- Restart Distributed Transaction Coordinator

The steps to solve the issue are the following in MXSuite:
- Go to (C:\Program Files\Mastex\Synchronization Service) MXSuiteSync.exe.config
- Right click Open
- Edit connectionStrings (The bold letters must be changed)
New: <add name="BaseConnectionString" connectionString="Data Source=(LOCAL)\mxsuite;Initial Catalog=MXSuite;Integrated Security=SSPI;MultipleActiveResultSets=True;Connect Timeout=60"/>
Old: <add name="BaseConnectionString" connectionString="Data Source=VLMAPP01\mxsuite;Initial Catalog=MXSuite;UserID=MXSuiteApp;Password=MXSuiteApp@1234;MultipleActiveResultSets=True;Connect Timeout=60"/> - Restart the database
- Check the logfiles of the synchronization service to check if there are no errors
MXSuite Excel Import – Export
In this chapter you can find technical details on preparing an import per module.
General info
Import field relations with general data
If you filled in the following columns in the Excel file:
- Budgetcodes
- Currencies
- Product categories
- Units
- Ranks
Then this data must exist in the Administration module
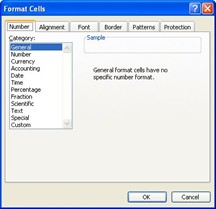
All fields in the Excel file must be in text format.
For example, if there is a problem after importing inventory with the PartNumber (column C) change the format of this column (Right mouse click on this column, select Format Cells) to category General
Do not change the top row of the Excel file! If this is changed, the import will fail
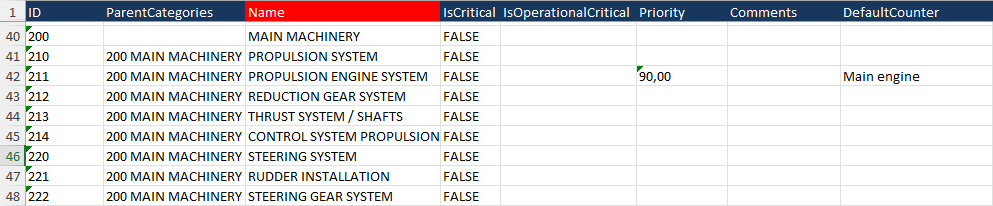
AssetsCategories
General
The categories will be used to link all maintenance tasks and spare parts to a category. The sheet in the Excel file is called “AssetsCategories”
Details fields
To fill the Excel file correctly, make sure that all fields are filled correctly. Below are the fields listed.
| Field | MAX Characters | Required | Comment |
| ID | 128 | Id number of the category | |
| ParentCategories | If this category is a child of another category, enter the ID number of the parent category, followed by a space, followed by the name of the parent category | ||
| Name | 128 | X | Name of the category |
| IsCritical | 5 | True or False | |
| IsOperationalCritical | 5 | True or False | |
| Priority | 18.2 | Number with 2 decimals, separated by a comma | |
| Comments | 1024 | Comment for the category | |
| Defaultcounter | 128 | Preferred counter for counter-based maintenance tasks. The name of the counter should be mentioned |
Example
AssetsCategoriesProperties
This part is used to load all Category Attributes in MXSuite. The sheet in the Excel file is called “AssetsCategoriesProperties”.
Details fields
To fill the Excel file correctly, make sure that all fields are filled correctly. Below are the fields listed.
| Field |
MAX Characters | Required | Comment |
| ParentCategories | X | Show the category path of the category that this entity needs to be connected to. If this is linked to a subcategory, enter the ID + name of the main category, followed by a space, > , and a space, followed by the ID + name of the subcategory | |
| Name | X | The Name of the attribute | |
| Value | The Value of the attribute | ||
| Type | X | The Type of the attribute, the default value is None | |
| ShowOnServiceOrders | If this information must be printed on the Service order, set the value to True; otherwise, set it to False | ||
| ShowOnProductOrders | If this information must be printed on the Product order, set the value to True; otherwise, set it to False |
Example

Counters
General
This part is used to load all counters in MXSuite. The sheet in the Excel file is called “Counters”.
Details fields
To fill the Excel file correctly, make sure that all fields are filled correctly. Below are the fields listed.
| Field | MAX Characters | Required | Comment |
| Name | 128 | X | Name of the Counter |
| Unit | 128 | X | The unit name should exactly match the name of the Unit as known in Administration -> Units |
| AveragePerWeek | X | The maximum average per week for the selected unit. For unit Running hours, the average must be set to 168 | |
| ActualCounterValue | X | The actual counter value for the imported counter machine | |
| ParentCounter | If the counter will use the input from another counter, specify here the countername |
Example

AssetsTasksGroups
General
All maintenance tasks are linked to a maintenance job plan. The job plan is linked to a category. So the maintenance job plans are between the categories and maintenance tasks.
The sheet in the Excel file is called “AssetsTasksGroups”.
Details fields
To fill the Excel file correctly, make sure that all fields are filled correctly. Below are the fields listed.
| Field | MAX Characters | Required | Comment |
| ParentCategories | X | Show the category path of the category that this entity needs to be connected to. If this is linked to a subcategory, enter the ID + name of the main category, followed by a space, > , and a space, followed by the ID + name of the subcategory | |
| Name | 128 | X | Name of the group |
| ID | 128 | ID number of the group | |
| CostCode | The Costcode name should exactly match the name of the Budgetcode as known in Administration -> Budgetcodes |
Example

AssetsTasks
General
This part is used to load all tasks in MXSuite. The sheet in the Excel file is called “AssetsTasks”.
Details fields
To fill the Excel file correctly, make sure that all fields are filled correctly. Below are the fields listed.
| Field | MAX Characters | Required | Comment |
| ParentCategories | X | Show the category path of the category that this entity needs to be connected to. If this is linked to a subcategory, enter the ID + name of the main category, followed by a space, > , and a space, followed by the ID + name of the subcategory | |
| AssetsTasksGroupName | 128 | X | Name of the group which the maintenance task is connected. |
| TaskType | 9 | X |
Type of the interval of the maintenance task. 2 options are possible: - Recurring: This is used if the task needs to be done according to a given interval - OneTime: This is used if the task needs to be done one time. There is no interval connected |
| ID | 128 | ID number of the maintenance task | |
| TaskName | 128 | X | The name of the maintenance task |
| UseTaskOnce | 5 | If the TaskType is set to Onetime, this setting must be set to True Otherwise, this setting must be set to False |
|
| IsDefect | 5 | Only if the Tasktype is set to Onetime, and the UseTaskOnce is set to True, can this setting be set to True if the task is a defect. Usually, this setting is False. | |
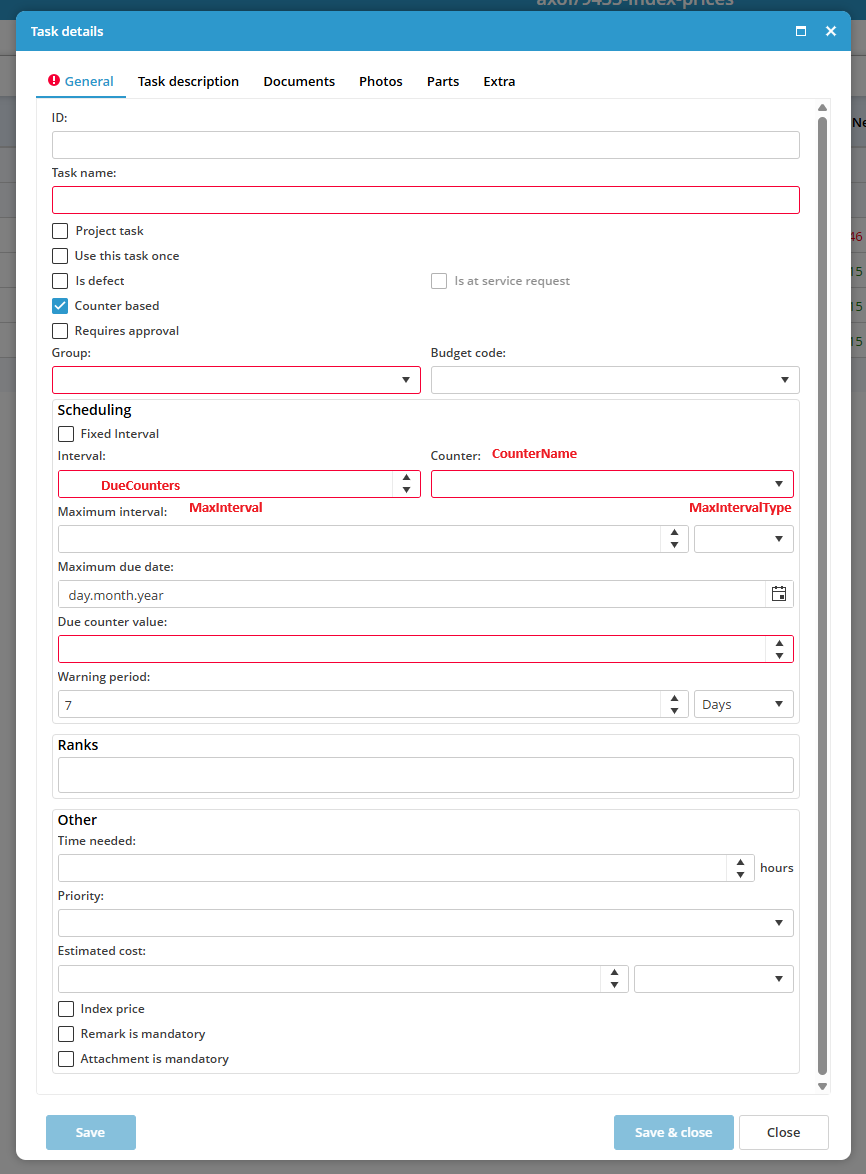
| IsCounterBased | 5 | If the maintenance task is based on running hours, this must be set to True; otherwise, fill in the option False. If the maintenance task is both based on running hours and time-based, set this to True. In column Duedate, fill in the proper date, and fill in column DueRunningHours, the due running hours value |
|
| IsRemarkMandatory | If a remark is mandatory during marking a maintenance task as done, set this to True If no remark is needed during marking a maintenance task as done, set this to False |
||
| CostCode | 50 | The Costcode name should exactly match the name of the Budgetcode as known in Administration -> Budgetcodes | |
| IsFixedInterval | 5 | If the maintenance task has a fixed interval, set this option to True. Otherwise, fill in option False | |
| IntervalValue | If the task has a time interval, fill in here the value of days/weeks/months If the task has a counter interval, fill in the value of the counters If the task is a one-time task, leave this field empty If the task is a docking task, leave this field empty |
||
| IntervalType | 6 | X* | * In case that the task is not a counter-based task or the field IsDocking = false, this field is mandatory Fill in here the type of interval. Possible values are: - Days - Weeks - Months |
| DueDate | 19 | X* |
* In case that the task is not a counter-based task or the field IsDocking = false, this field is mandatory. The due date of the task. Written in the date-time format of the PC that imports the file. The default Dutch format is D-M-YYYY HH:MM:ss |
| MaximumIntervalValue | If the task is based on counters and time-based, fill here the number of days/weeks/months | ||
| MaximumIntervalType | 6 | X* | * In case a value is entered in MaximumIntervalValue, this field is mandatory. Fill in here the type of interval. Possible values are: - Days - Weeks - Months |
| RunningHoursMachine | X* |
*In case the task is counter-based, this field is mandatory. Fill in the name of the related counter machine here. |
|
| DueRunningHours | X* |
*In case the task is counter-based, this field is mandatory. Fill in here the value of the counter when the task becomes due. A numeric value is accepted without decimals. |
|
| IsProject | 5 | Is the task is related to a project, set the value to True, otherwise set to False | |
| DownTime | The time needed to finish the task in hours. Only a numeric value without decimals is accepted. | ||
| WarningPeriod | Here, the warning period as a numeric field in combination with the field WarningType. For example, WarningPeriod 7 and WarningType 1 mean that the task becomes due 7 days before the due date; in this case, fill in number 7. |
||
| WarningType | 1 | Fill in here the type of interval. Possible values are: Value 1 for the interval in days Value 2 for the interval in weeks Value 3 for the interval in months |
|
| LongDescription | The long task description where the procedures can be described how to perform the task. With Alt-Enter in the Excel sheet, the text starts on a new line. Note: layout formatting is not possible via the import from Excel. |
||
| TaskCompletionNeedsApproval | 5 |
If the task needs to be approved by another rank, set the value to True. If the task does not need to be approved by another rank, set the value to False. Note: The approver rank can be entered in Sheet: AssetsTasksApproversRanks |
|
| IsAttachmentMandatory | 5 |
If an attachment is required when completing the task, set this value to True If an attachment is not required when completing the task, set this value to False |
|
| Priority |
The possible priorities are:
- Top priority
|
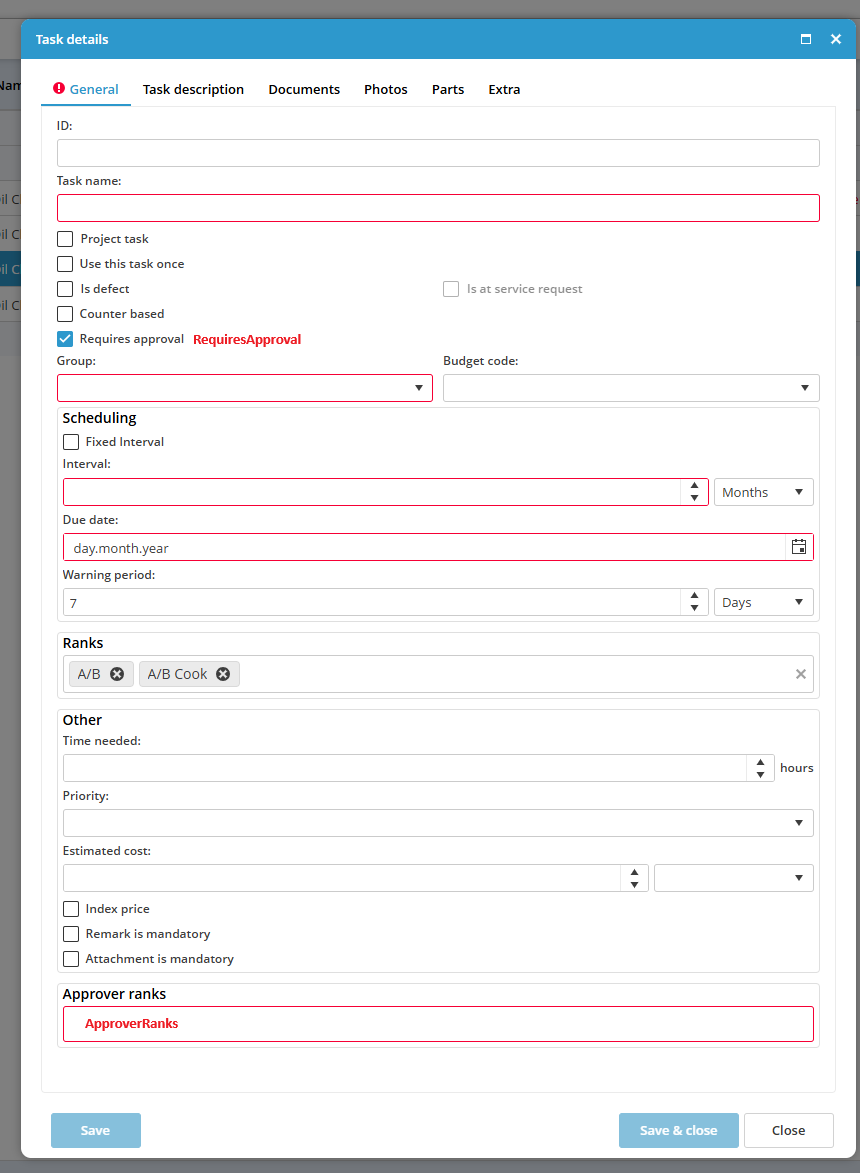
AssetsTasksRanks
General
This part is used to link ranks to a task. The sheet in the Excel file is called “AssetsTasksRanks”.
Details fields
To fill the Excel file correctly, ensure that all fields are completed accurately. Below are the fields listed.
| Field | MAX Characters | Required | Comment |
| ParentCategories | X | Show the category path of the category that this entity needs to be connected to. If this is linked to a subcategory, enter the ID + name of the main category, followed by a space, > , and a space, followed by the ID + name of the subcategory | |
| AssetsTasksGroupName | 128 | X | Name of the group to which the maintenance task is connected. |
| TaskName | 128 | X | The name of the maintenance task |
| RankName | X | The name of the rank that must be linked to the task |
If more ranks must be linked to one task, add per rank a new line to be linked to the task.
AssetsTasksApproversRanks
General
This part is used to link the ranks that must approve the task signoff. The sheet in the Excel file is called “AssetsTasksApproversRanks”.
Details fields
To fill the Excel file correctly, ensure that all fields are completed accurately. Below are the fields listed.
| Field | MAX Characters | Required | Comment |
| ParentCategories | X | Show the category path of the category that this entity needs to be connected to. If this is linked to a subcategory, enter the ID + name of the main category, followed by a space, >, and a space, followed by the ID + name of the subcategory | |
| AssetsTasksGroupName | 128 | X | Name of the group to which the maintenance task is connected. |
| TaskName | 128 | X | The name of the maintenance task |
| RankName | X | The name of the rank that must approve the task signoff |
If more ranks can approve the task signoff, add a new line per rank to be linked to the task.
AssetsTasksParts
General
This part is used to link the parts that are used during the task sign-off. The sheet in the Excel file is called “AssetsTasksParts”.
Details fields
To fill the Excel file correctly, ensure that all fields are completed accurately. Below are the fields listed.
| Field | MAX Characters | Required | Comment |
| ParentCategories | X | Show the category path of the category that this entity needs to be connected to. If this is linked to a subcategory, enter the ID + name of the main category, followed by a space, >, and a space, followed by the ID + name of the subcategory | |
| AssetsTasksGroupName | 128 | X | Name of the group to which the maintenance task is connected. |
| TaskName | 128 | X | The name of the maintenance task |
| Owncode | 50 | X | The unique number of the part that will be linked to the task |
| Quantity | X | The quantity of the part that will be used during the task sign-off | |
| CostCode | 50 | Lookup to the Cost Codes as defined in the tab Administration. This should exactly match the name of the cost code. |
C-drive full during synchronisation
During the creation of a big synchronisation package, it could happen that a lot of files are created in the folder C:/Windows/SystemTemp. If there is not enough space on the disk, the sync package cannot be created. Therefore, it could be useful to move that folder to another location.
Here is how to do that.
- Log in using a Windows administrator account on the server.
- Create a folder named "SystemTemp" on a drive with sufficient space.
- Search for "This PC".
- Right-click Properties.
- Select "Advanced Settings".
- Click on "Environment Variables".
- Click on "New" under system variables.
- Enter "SYSTEMTEMP" for the variable name and the location of the folder you created earlier.

- Click OK, and then reboot the server.
- Restart the client computer and attempt to create the sync package again.
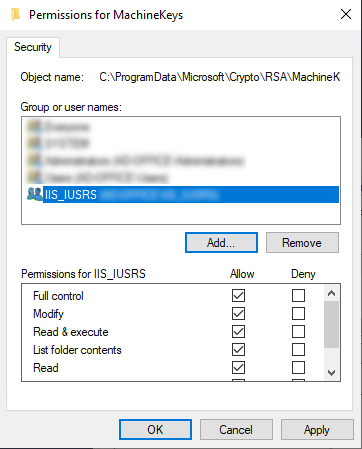
The specified network password is not correct.
When login to MXSuite the following error message appear : [System.Security.Cryptography.CryptographicException] The specified network password is not correct.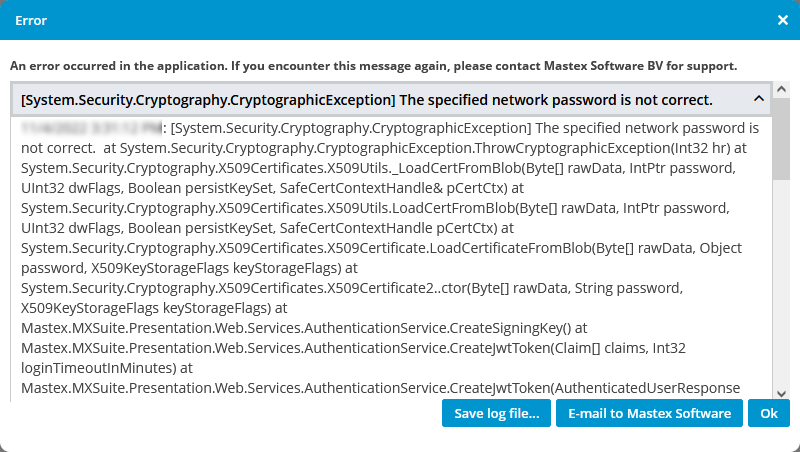
Solution
- Go to folder C:\ProgramData\Microsoft\Crypto\RSA\
- Right mouse click on the folder MachineKeys and choose Properties
- Go to the tab Security and click Edit
- Check if IIS_IUSRS has Full control permission
In case you don't see the user IIS_IUSRS, please follow the steps below:
- Click Add and search for user: IIS_IUSRS and click on OK
- Give the user IIS_IUSRS Full control rights on the folder MachineKeys

- Click OK and OK
Unable to upload big files
It can happen that MXSuite fails when uploading a file larger than 30 MB.
When you expect that MXSuite will upload the file, the upload will never happen.
<requestLimits maxAllowedContentLength="262144000" />This line must be added between
 <security>
 <requestFiltering>
[Other commands]

 </requestFiltering>
 </Security>
Example below:
                    <add fileExtension=".refresh" allowed="false" />
                    <add fileExtension=".compiled" allowed="false" />
                    <add fileExtension=".msgx" allowed="false" />
                    <add fileExtension=".vsdisco" allowed="false" />
                    <add fileExtension=".rules" allowed="false" />
                </fileExtensions>
                <verbs allowUnlisted="true" applyToWebDAV="true" />
                <hiddenSegments applyToWebDAV="true">
                    <add segment="web.config" />
                    <add segment="bin" />
                    <add segment="App_code" />
                    <add segment="App_GlobalResources" />
                    <add segment="App_LocalResources" />
                    <add segment="App_WebReferences" />
                    <add segment="App_Data" />
                    <add segment="App_Browsers" />
                </hiddenSegments>
            </requestFiltering>
            <requestLimits maxAllowedContentLength="262144000" />
        </security>
After the file is saved, a restart of the IIS Server is required.
Administrative rights of this folder must be present for the current user