# Administration

# How do I set my password policy?

1. Go to **Administration &gt; Users &gt; Settings**
2. Enable the tickbox for **Password strength  
    [![pwstrength.png](https://docs.mxsuite.nl/uploads/images/gallery/2024-11/scaled-1680-/pwstrength.png)](https://docs.mxsuite.nl/uploads/images/gallery/2024-11/pwstrength.png)**
3. Configure your password strength 
    1. Fill in the minimum length of a password. Recommended is a minimum of 8 characters.
    2. Configure the policy of character types: 
        - *Lower case* example: abcdefg
        - *Upper case* example: ABCDEFG
        - *Digits* example: 123456
        - *Non-alphanumeric* example: !@#$%^&amp;
4. Click on **Save**.

<p class="callout info">**Note:** If the password policy is changed, it will be changed for the entire fleet (office + all other locations)  
If the current password of a user does not comply with the password policy, the user is requested to change the password immediately at login.</p>

# How do I create a new user?

1. Go to **Administration &gt; Users**.
2. Click **New...**
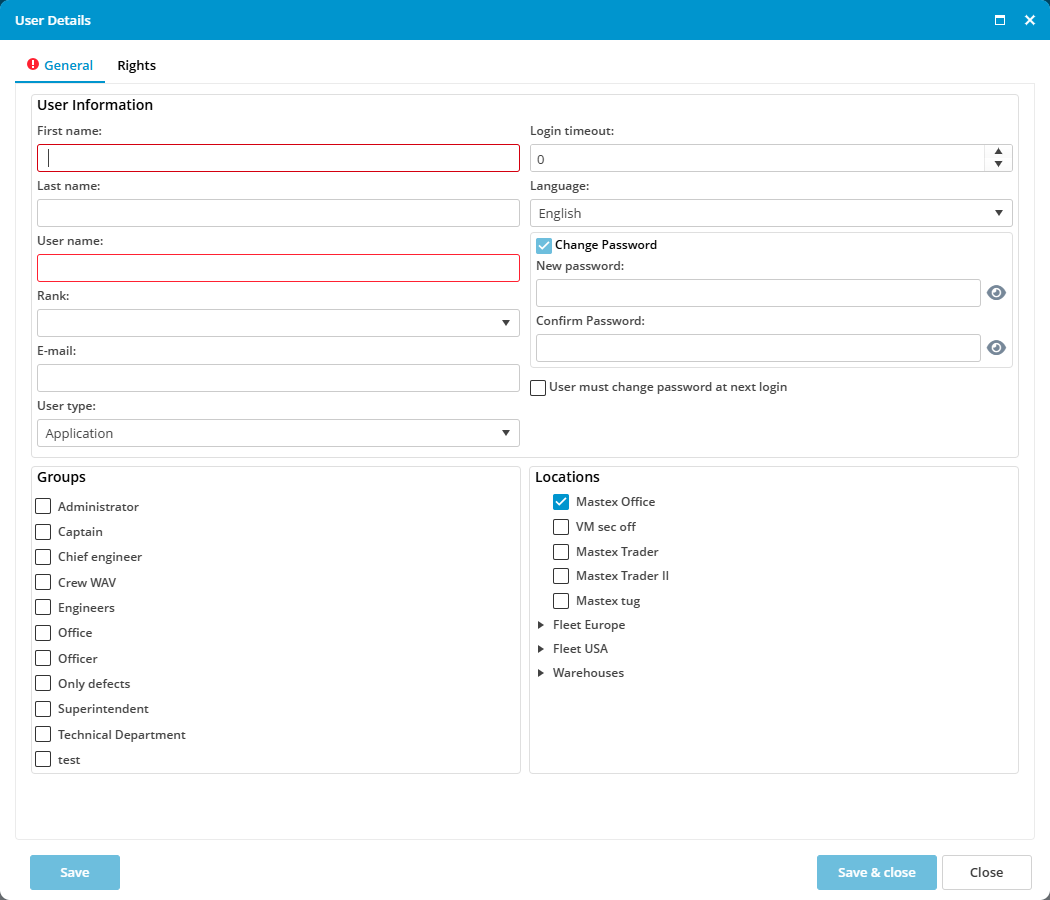
3. Fill in all required fields  
    [![newuser.png](https://docs.mxsuite.nl/uploads/images/gallery/2024-11/scaled-1680-/newuser.png)](https://docs.mxsuite.nl/uploads/images/gallery/2024-11/newuser.png)
4. Click on **Save &amp; close**.

<p class="callout info">- The generated password should comply the rules as configured in Administration &gt; Users &gt; Settings.  
- Select the user groups for the newly created user.  
- Select the locations that should be visible to the user.  
 - Office: this allows the user to login into the office application  
 - Other locations: the user can login into these locations and these locations are visible for the user if he logs into the office.</p>

# How to copy a user to a new user

1. To create a new user with similar user rights as another existing user go to **Administration &gt; Users**.
2. Find the user you would like to copy (whose access you want to mirror)
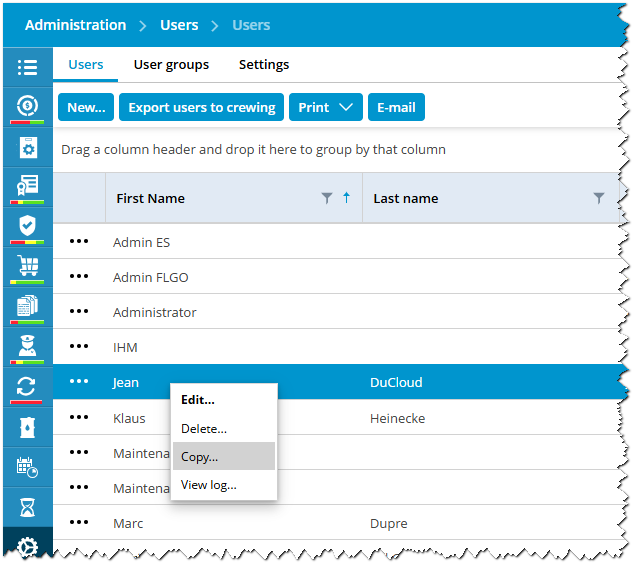
3. Right-mouse click on the user and select the option “**Copy**” to open the **Copy User** window  
    [![copyuser1.png](https://docs.mxsuite.nl/uploads/images/gallery/2024-11/scaled-1680-/copyuser1.png)](https://docs.mxsuite.nl/uploads/images/gallery/2024-11/copyuser1.png)
4. Fill in the First name, Last name, User name, Rank, and language.  
    Also, create the initial password that the new user will use to log in the first time.  
    [![copyuser2.png](https://docs.mxsuite.nl/uploads/images/gallery/2024-11/scaled-1680-/copyuser2.png)](https://docs.mxsuite.nl/uploads/images/gallery/2024-11/copyuser2.png)
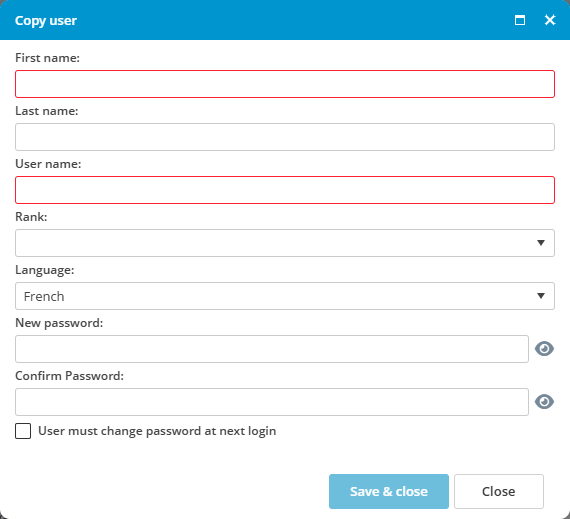
5. Select the checkbox **User must change password at next login**.
6. Click on **Save &amp; close**.

# How to reset a password for a user

1. Go to **Administration &gt; Users**
2. Double-click on the user name to open the User Details window.
3. Select the checkbox **Change Password**
4. Create a default password that meets all the requirements
5. Select the checkbox **User must change password at next login** so that when the user logs in with the default password, the system will prompt him to change the password and create a new one only known to him
6. Click on **Save &amp; close**.

# How To Enable 2FA (Two Factor Authentication) ?

##### Authenticator Apps

To secure access to MXSuite, **two factor authentication** can be enabled. Two factor authentication (2FA) is also known as multi-factor authentication (MFA), or one time password (OTP). It adds an additional layer of security to users' accounts, requiring a verification code to be entered in addition to the password when logging in. This code is generated by an authenticator app and is usually renewed within 30 seconds. You can use any authenticator app that is available in your Apple app store or the Android Play store.

##### Video

<iframe height="314" src="https://www.youtube.com/embed/cOIgvdxUHtI" width="560"></iframe>

##### How to Activate 2FA in MXSuite?

To activate two-factor authentication in MXSuite:

1. The first step to do is to go to the **Administration** section.
2. On the page that opens, select **Company**.  
    [![administration_page1.png](https://docs.mxsuite.nl/uploads/images/gallery/2024-11/scaled-1680-/administration-page1.png)](https://docs.mxsuite.nl/uploads/images/gallery/2024-11/administration-page1.png)
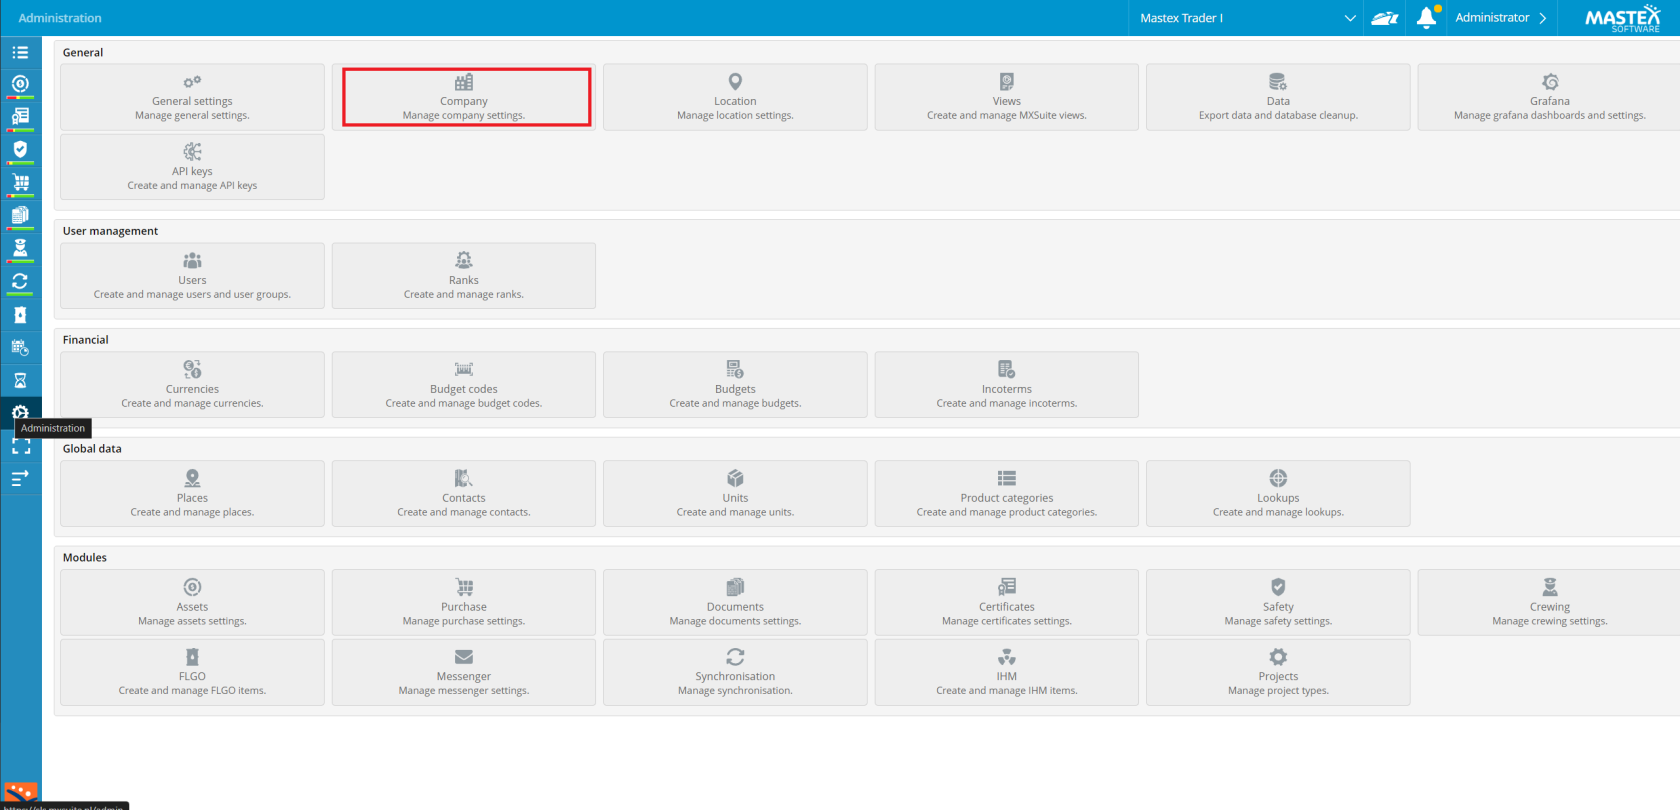
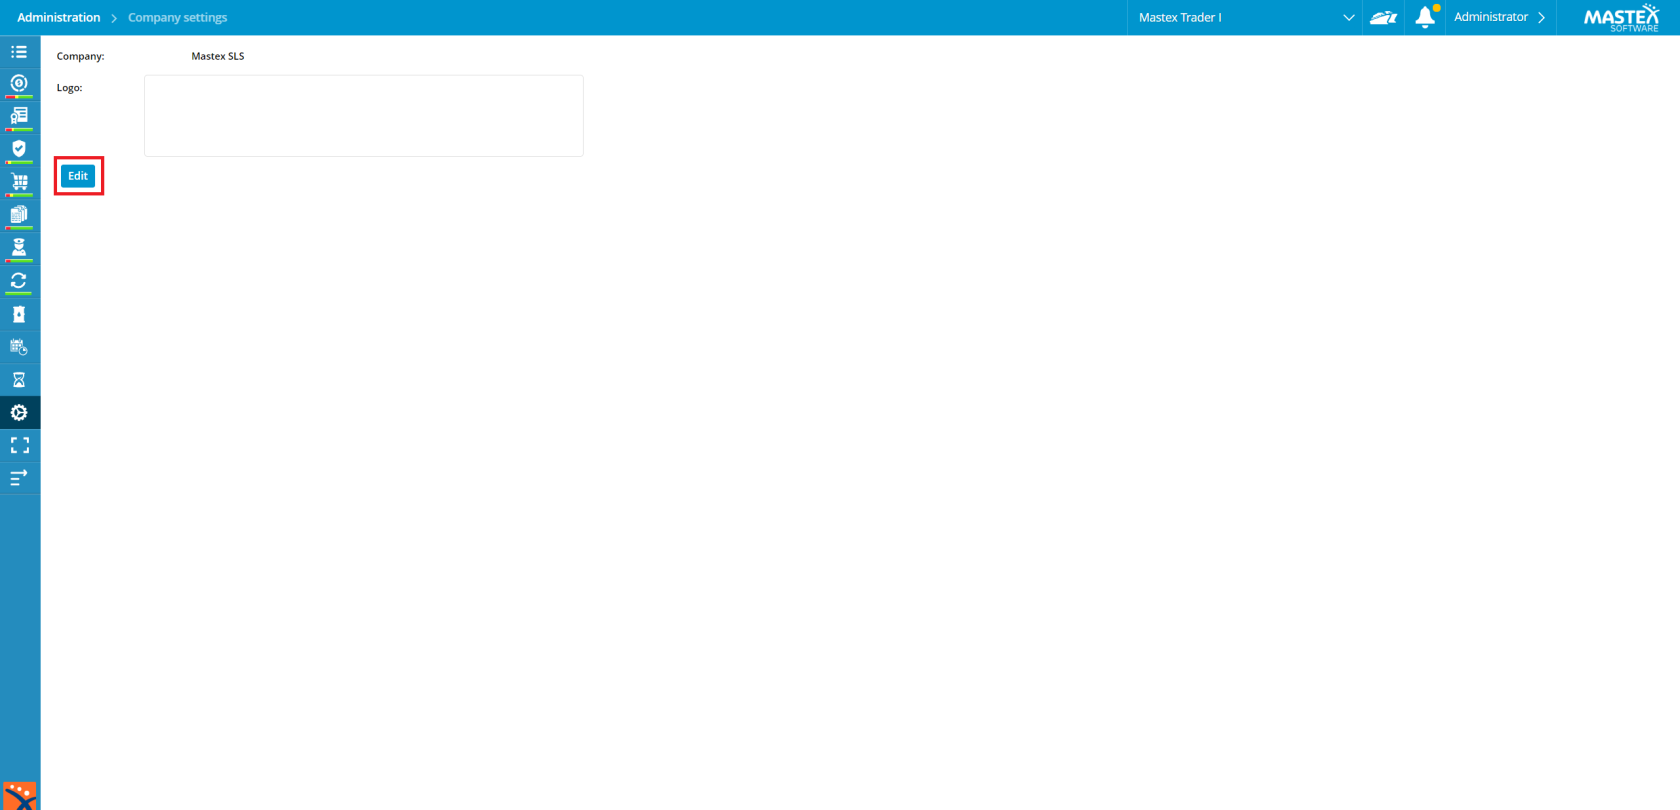
3. Select **Edit**.  
    [![comp_set_edit1.png](https://docs.mxsuite.nl/uploads/images/gallery/2024-11/scaled-1680-/comp-set-edit1.png)](https://docs.mxsuite.nl/uploads/images/gallery/2024-11/comp-set-edit1.png)
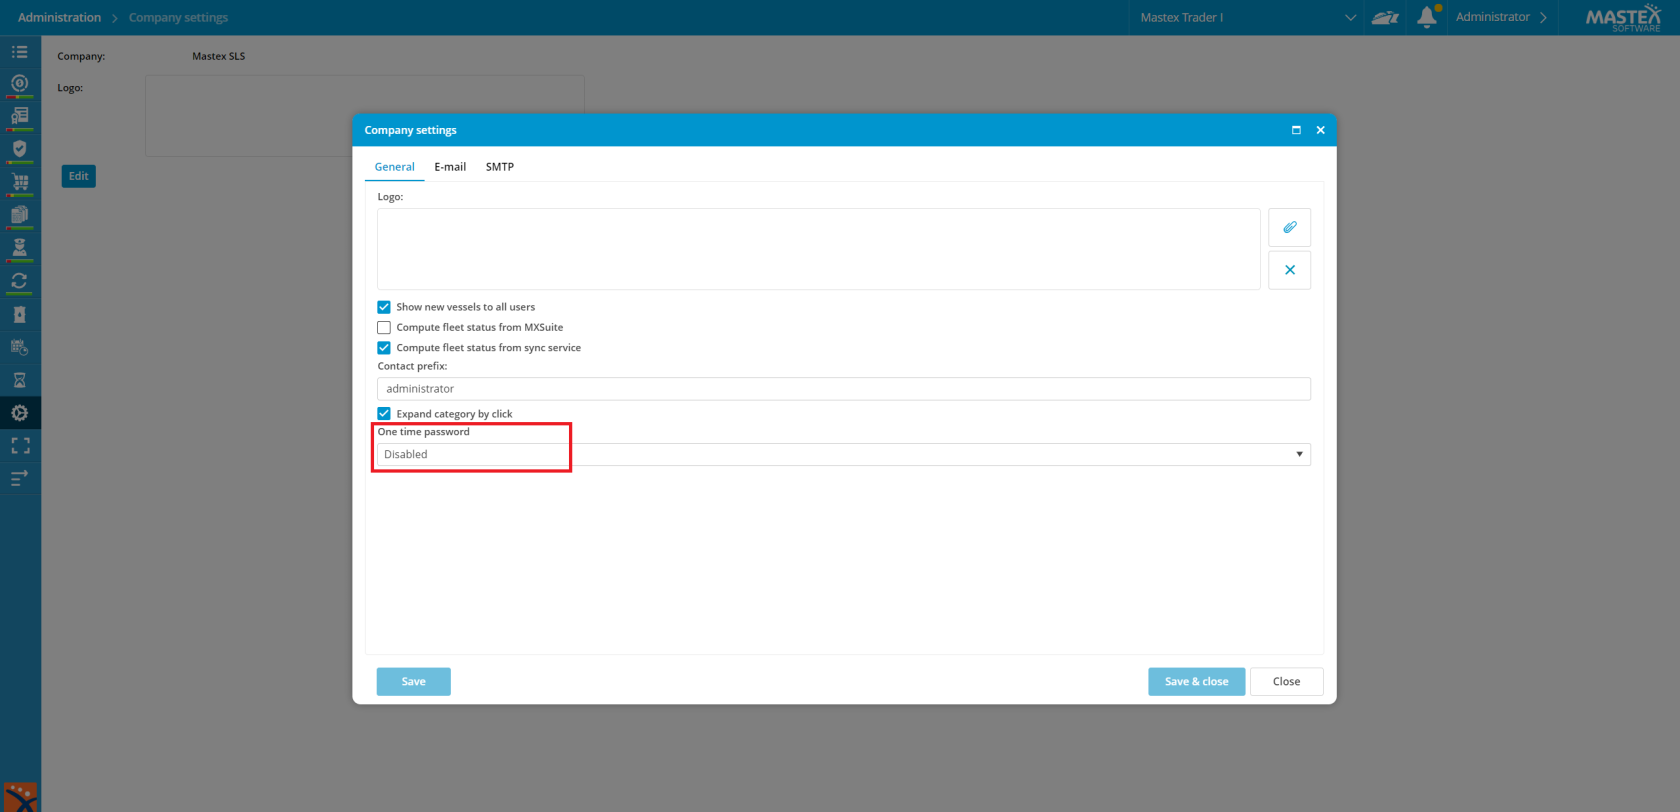
4. The dropdown menu below is marked as one-time password **Disabled.  
    [![comp_sett_onetime_pass_disabled.png](https://docs.mxsuite.nl/uploads/images/gallery/2024-11/scaled-1680-/comp-sett-onetime-pass-disabled.png)](https://docs.mxsuite.nl/uploads/images/gallery/2024-11/comp-sett-onetime-pass-disabled.png)**
5. Let's change it as desired. For example, for example **Office Only.   
    [![comp_sett_onetime_pass_office_only.png](https://docs.mxsuite.nl/uploads/images/gallery/2024-11/scaled-1680-/comp-sett-onetime-pass-office-only.png)](https://docs.mxsuite.nl/uploads/images/gallery/2024-11/comp-sett-onetime-pass-office-only.png)**
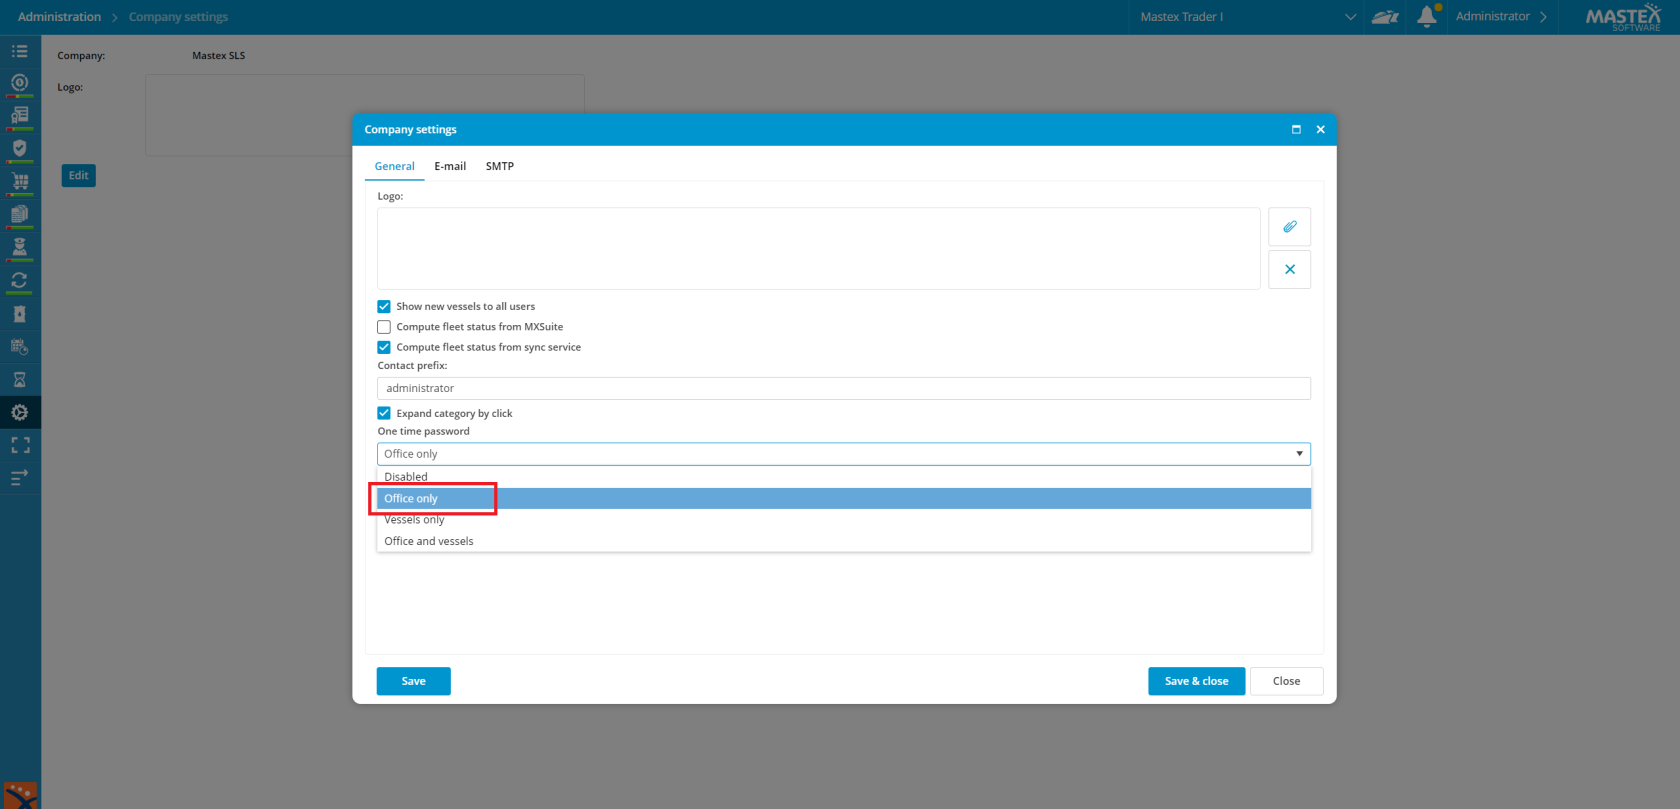
6. Click **Save &amp; close.**

##### Reset 2FA for a user

If a user has a new phone, or for any reason the second authentication does not work for that user anymore, you can reset the 2FA.

1. Goto A**dministration &gt; Users**.
2. Select the user where you want to reset the 2FA and select **Edit**.   
    [![users_administrator_edit2.png](https://docs.mxsuite.nl/uploads/images/gallery/2024-11/scaled-1680-/users-administrator-edit2.png)](https://docs.mxsuite.nl/uploads/images/gallery/2024-11/users-administrator-edit2.png)
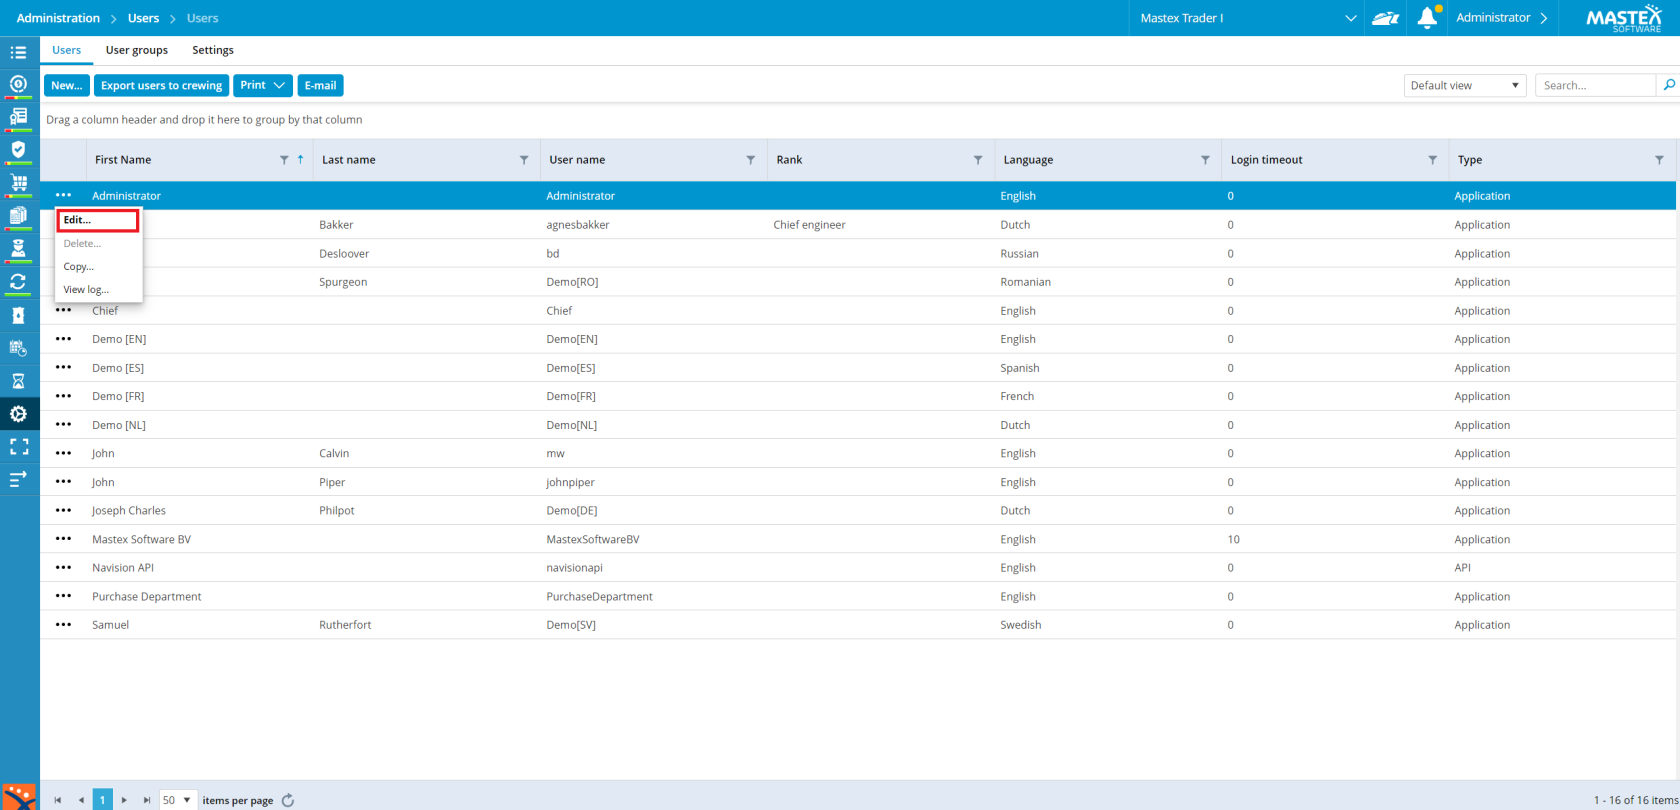
3. Enable the tickbox **User must reconfigure OTP at next login**.  
    [![users_administrator_edit_otp11.png](https://docs.mxsuite.nl/uploads/images/gallery/2024-11/scaled-1680-/users-administrator-edit-otp11.png)](https://docs.mxsuite.nl/uploads/images/gallery/2024-11/users-administrator-edit-otp11.png)
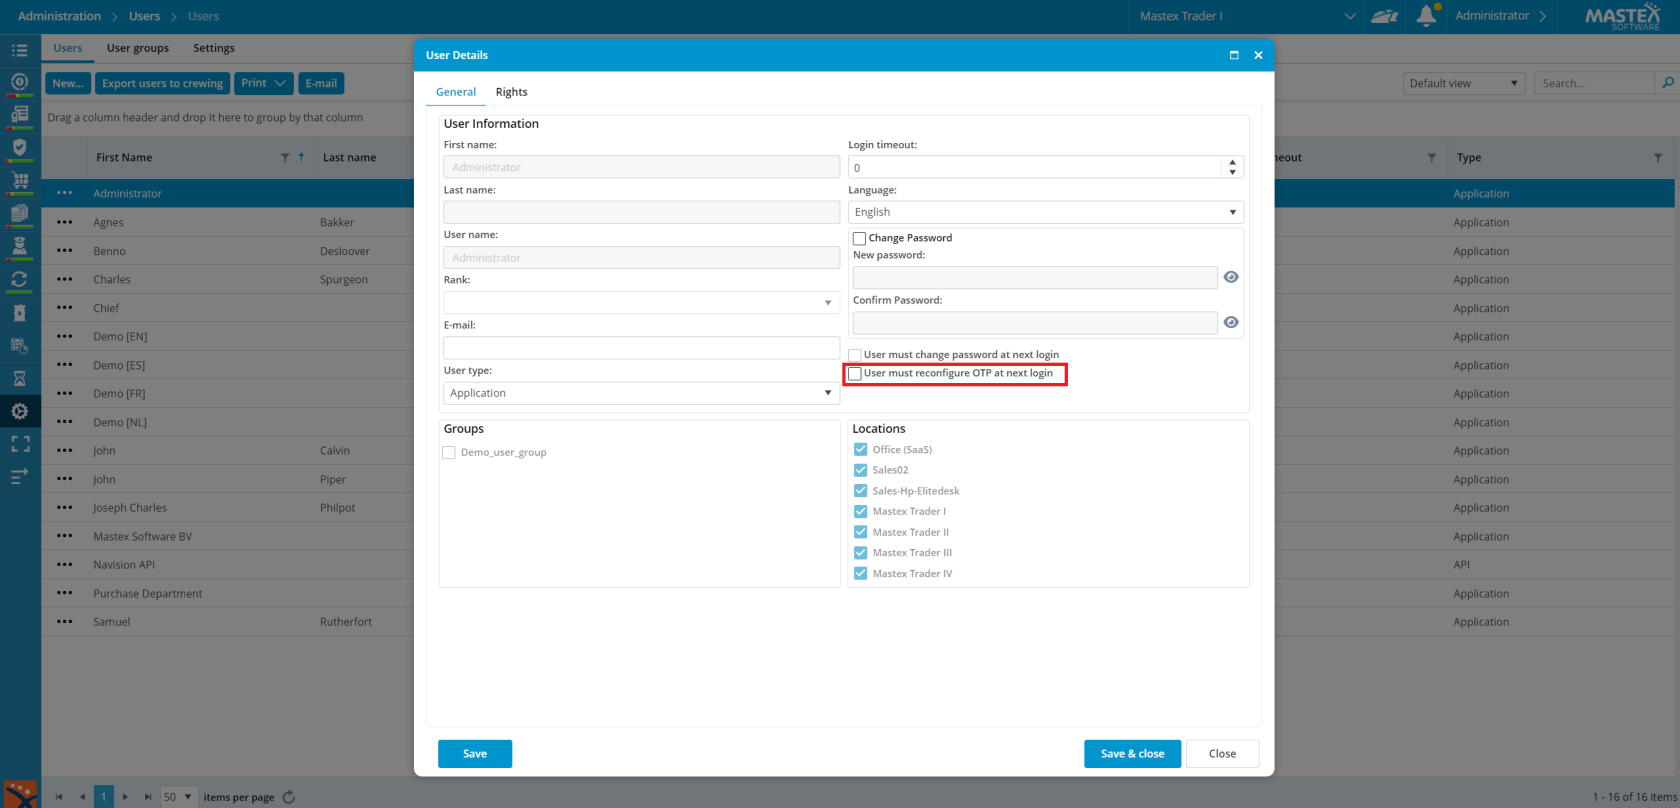
4. Click **Save &amp; close**.

##### First login after 2FA is enabled or reset

1. When the user tries to log in, a **QR code** will appear after the username and password are correctly entered.  
      
    [![qr_code.png](https://docs.mxsuite.nl/uploads/images/gallery/2024-11/qr-code.png)](https://docs.mxsuite.nl/uploads/images/gallery/2024-11/qr-code.png)
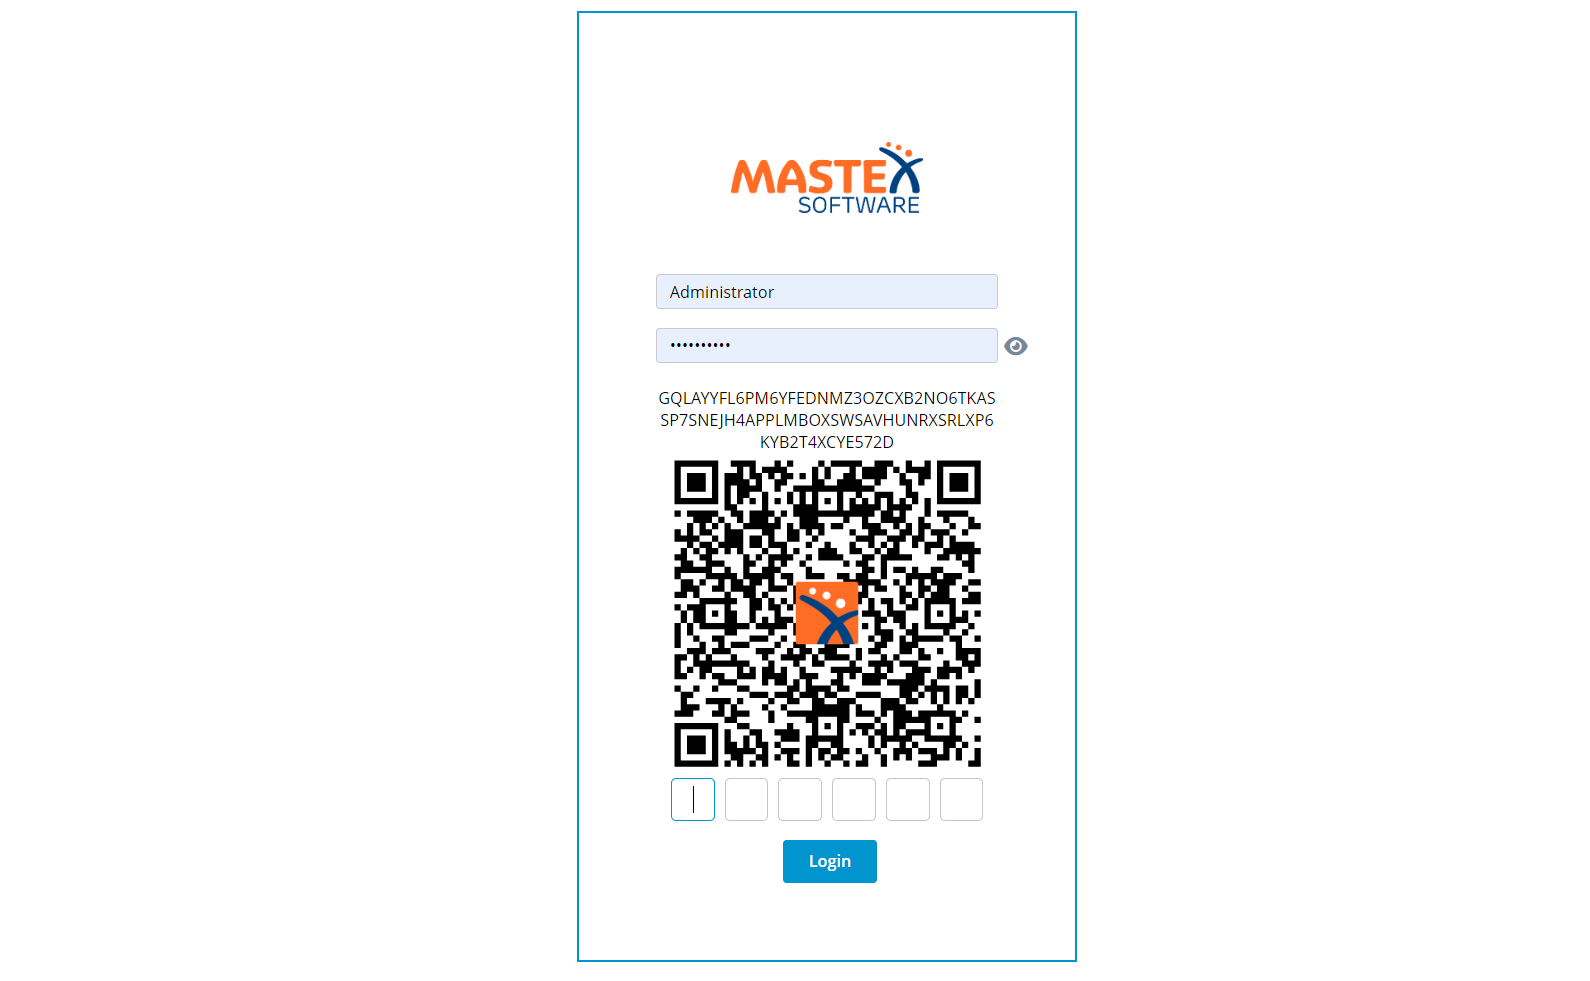
2. Scan the QR code with the **Authenticator app** you downloaded
3. In the authenticator app, a 6-digit code appears. Enter this 6-digit number below the QR code and login.

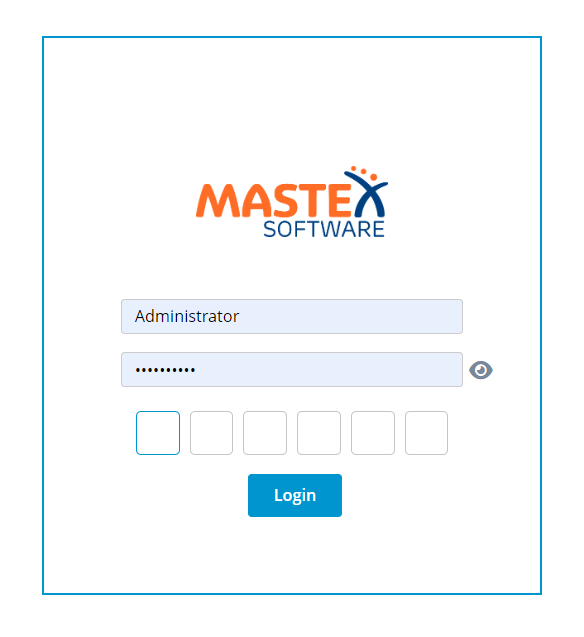
<p class="callout info">Every time the user logs into MXSuite, the authenticator app should be opened, and the given 6-digit number should be entered during login.  
[![login_code.png](https://docs.mxsuite.nl/uploads/images/gallery/2024-11/scaled-1680-/login-code.png)](https://docs.mxsuite.nl/uploads/images/gallery/2024-11/login-code.png)  
</p>

# How do I copy data to another location?

1. Select the location you want to copy data from.
2. Go to the module **Administration.**
3. Click on **Data.**
4. Select the desired data and click **Export.  
    [![exportdata.png](https://docs.mxsuite.nl/uploads/images/gallery/2024-11/scaled-1680-/exportdata.png)](https://docs.mxsuite.nl/uploads/images/gallery/2024-11/exportdata.png)**
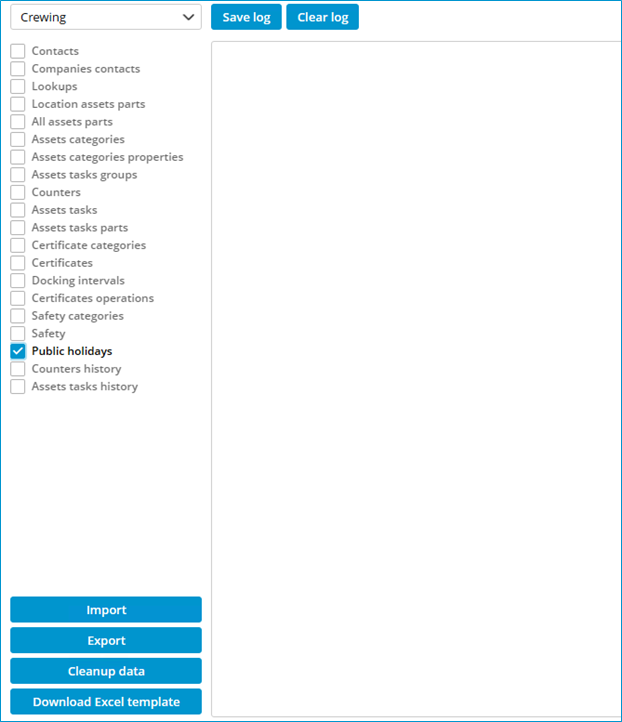
5. Select the ship to which you want to import the data.
6. Select the same data within **Administration &gt; Data** and click import.
7. Select the downloaded excel file and click **Open** and **Yes**.

<p class="callout info">If **Machines** is selected, the following is copied:   
- Categories  
- Category details  
- Task lists  
- Tasks  
- Related machine running hours  
- Linked documents  
- Linked articles</p>

<p class="callout danger">It is not possible to copy machines if both MXSuite Gold and Silver licenses are present.</p>

# Data import via Excel

# General info

#### <span style="mso-bookmark: OLE_LINK230;"><span style="mso-bookmark: OLE_LINK229;"><span lang="EN-GB" style="mso-ansi-language: EN-GB;">Import Field relations with general data</span></span></span>

<span lang="EN-GB" style="mso-ansi-language: EN-GB;">If you filled in the following columns in the Excel file: </span>

- Cost Code
- <span lang="EN-GB" style="mso-ansi-language: EN-GB;">Currencies</span>
- <span lang="EN-GB" style="mso-ansi-language: EN-GB;">Product categories</span>
- <span lang="EN-GB" style="mso-ansi-language: EN-GB;">Units</span>

<span lang="EN-GB" style="mso-ansi-language: EN-GB;">Then this data must exist in the Administration module.</span>

<span lang="EN-GB" style="mso-ansi-language: EN-GB;">All fields in the Excel file <span style="text-decoration: underline;">must be</span> in text format.</span>

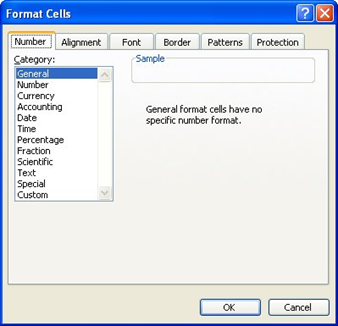
<span lang="EN-GB" style="mso-ansi-language: EN-GB;">For example, if there is a problem after importing inventory with the PartNumber (column C) change the format of this column (Right mouse click on this column, select Format Cells) to the category **General**.</span>

[![image.png](https://docs.mxsuite.nl/uploads/images/gallery/2025-02/scaled-1680-/xc5image.png)](https://docs.mxsuite.nl/uploads/images/gallery/2025-02/xc5image.png)

<p class="callout warning"><span lang="EN-US" style="font-size: 11.0pt; font-family: 'Calibri Light',sans-serif; mso-fareast-font-family: Calibri; color: black; mso-ansi-language: EN-US; mso-fareast-language: NL; mso-bidi-language: AR-SA;">Do not change the top row of the Excel file! If this is changed, the import will fail!</span></p>

# Asset categories

<span lang="EN-GB" style="mso-ansi-language: EN-GB;">The categories will link all tasks and spare parts to a category. The sheet in the Excel file is called “CategoryList”.</span>

<span lang="EN-GB" style="mso-ansi-language: EN-GB;">To fill out the Excel file properly, ensure that all fields are filled out properly. Below are the fields listed.</span>

<table border="1" id="bkmrk-field-max-characters" style="width: 100%;"><colgroup><col style="width: 20.739%;"></col><col style="width: 12.9917%;"></col><col style="width: 9.7724%;"></col><col style="width: 56.497%;"></col></colgroup><thead><tr style="background-color: rgb(230, 126, 35);"><td valign="top">**<span lang="EN-GB">Field</span>**

</td><td valign="top">**<span lang="EN-GB">MAX Characters</span>**

</td><td valign="top">**<span lang="EN-GB">Required</span>**

</td><td valign="top">**<span lang="EN-GB">Comment</span>**

</td></tr></thead><tbody><tr><td valign="top">**<span lang="EN-GB">ID</span>**

</td><td valign="top"><span lang="EN-GB">128</span>

</td><td valign="top"><span lang="EN-GB"> </span>

</td><td valign="top"><span lang="EN-GB">Id number of the category</span>

</td></tr><tr><td valign="top">**<span lang="EN-GB">ParentCategories</span>**

</td><td valign="top"><span lang="EN-GB"> </span>

</td><td valign="top"><span lang="EN-GB"> </span>

</td><td valign="top"><span lang="EN-GB">If this category is a child of another category, enter the ID number of the parent category, followed by a space, followed by the name of the parent category</span>

</td></tr><tr><td valign="top">**<span lang="EN-GB">Name</span>**

</td><td valign="top"><span lang="EN-GB">128</span>

</td><td valign="top"><span lang="EN-GB">X</span>

</td><td valign="top"><span lang="EN-GB">Name of the category</span>

</td></tr><tr><td valign="top">**<span lang="EN-GB">IsCritical</span>**

</td><td valign="top"><span lang="EN-GB"> </span>

</td><td valign="top"><span lang="EN-GB">X</span>

</td><td valign="top"><span lang="EN-GB">True or False </span>

</td></tr><tr><td valign="top">**<span lang="EN-GB">Priority</span>**

</td><td valign="top"><span lang="EN-GB">18,2</span>

</td><td valign="top"><span lang="EN-GB"> </span>

</td><td valign="top"><span lang="EN-GB">Number with 2 decimals, separated by a comma</span>

</td></tr><tr><td valign="top">**<span lang="EN-GB">Comments</span>**

</td><td valign="top"><span lang="EN-GB">1024</span>

</td><td valign="top"><span lang="EN-GB"> </span>

</td><td valign="top"><span lang="EN-GB">Comment for the category</span>

</td></tr><tr><td valign="top">**<span lang="EN-GB">PreferredRunningHour</span>**

</td><td valign="top"><span lang="EN-GB"> </span>

</td><td valign="top"><span lang="EN-GB"> </span>

</td><td valign="top"><span lang="EN-GB">Preferred counter for counter-related tasks. The name of the counter should be mentioned</span>

</td></tr></tbody></table>

#### <span lang="EN-GB" style="mso-ansi-language: EN-GB;">Example</span>

[![image.png](https://docs.mxsuite.nl/uploads/images/gallery/2025-02/scaled-1680-/image.png)](https://docs.mxsuite.nl/uploads/images/gallery/2025-02/image.png)

# Asset tasks groups

<span lang="EN-GB" style="mso-ansi-language: EN-GB;">All tasks are linked to a maintenance job plan. The job plan is linked to a category. So the maintenance job plans are between the categories and maintenance tasks.</span>

<span lang="EN-GB" style="mso-ansi-language: EN-GB;">The sheet in the Excel file is called **MaintenanceJobPlanList**.</span>

<span lang="EN-GB" style="mso-ansi-language: EN-GB;">To fill the Excel file correctly, take care that all fields are properly filled. Below are the fields listed.</span>

<table border="1" cellpadding="0" cellspacing="0" id="bkmrk-field-max-characters" style="width: 100%;"><thead><tr style="background-color: rgb(230, 126, 35);"><td style="width: 16.5673%;" valign="top">**<span lang="EN-GB">Field</span>**

</td><td style="width: 11.0846%;" valign="top">**<span lang="EN-GB">MAX Characters</span>**

</td><td style="width: 12.3976%;" valign="top">**<span lang="EN-GB">Required</span>**

</td><td style="width: 59.9505%;" valign="top">**<span lang="EN-GB">Comment</span>**

</td></tr></thead><tbody><tr><td style="width: 16.5673%;" valign="top">**<span lang="EN-GB">ParentCategories</span>**

</td><td style="width: 11.0846%;" valign="top"><span lang="EN-GB"> </span>

</td><td style="width: 12.3976%;" valign="top"><span lang="EN-GB">X</span>

</td><td style="width: 59.9505%;" valign="top"><span lang="EN-GB">If this category is a child of another category, enter the ID number of the parent category, followed by a space, followed by the name of the parent category</span>

</td></tr><tr><td style="width: 16.5673%;" valign="top">**<span lang="EN-GB">Name</span>**

</td><td style="width: 11.0846%;" valign="top"><span lang="EN-GB">128</span>

</td><td style="width: 12.3976%;" valign="top"><span lang="EN-GB">X</span>

</td><td style="width: 59.9505%;" valign="top"><span lang="EN-GB">Name of the Job Plan</span>

</td></tr><tr><td style="width: 16.5673%;" valign="top">**<span lang="EN-GB">ID</span>**

</td><td style="width: 11.0846%;" valign="top"><span lang="EN-GB">128</span>

</td><td style="width: 12.3976%;" valign="top"><span lang="EN-GB"> </span>

</td><td style="width: 59.9505%;" valign="top"><span lang="EN-GB">ID number of the job plan</span>

</td></tr><tr><td style="width: 16.5673%;" valign="top">**<span lang="EN-GB">CostCode</span>**

</td><td style="width: 11.0846%;" valign="top"><span lang="EN-GB"> </span>

</td><td style="width: 12.3976%;" valign="top"><span lang="EN-GB"> </span>

</td><td style="width: 59.9505%;" valign="top"><span lang="EN-GB">Lookup to the Cost Codes as defined in the tab Administration. This should exactly match the <u>name</u> of the cost code.</span>

</td></tr></tbody></table>

#### Example

[![image.png](https://docs.mxsuite.nl/uploads/images/gallery/2025-02/scaled-1680-/aZ6image.png)](https://docs.mxsuite.nl/uploads/images/gallery/2025-02/aZ6image.png)